Writing JSP, Java and Configuration for Hello World Application


In this section we will write JSP, Java and required configuration files for our Struts 2 Hello World application. Now in struts 2 struts.xml is used to configure the applications.
Understanding the application
Our application is very simple application that displays Hello World message along with current date and time of the server. When user clicks on the "Run Struts 2 Hello World Application" link on the tutorial home page, a request is sent to the struts framework. Then struts framework sends the input to the action class (in our case Struts2HelloWorld.java). After action is fired the Result selects the resource "/pages/HelloWorld.jsp" to render the response.
In this example we have to develop three parts view, Action class and mapping (struts.xml) to couple action and page. By creating these three components we are separating the application in three parts View, Model and Controller.
Developing View:
This page is used to display the result on the browser. The HelloWorld.jsp is
view part of our application. Create "HelloWorld.jsp" in the struts2tutorial\pages
directory and add the following content:
| <%@ taglib prefix="s" uri="/struts-tags" %> <html> <head> <title>Struts 2 Hello World Application!</title> </head> <body> <h2><s:property value="message" /></h2> <p>Current date and time is: <b><s:property value="currentTime" /></b> </body> </html> |
The line <%@ taglib prefix="s" uri="/struts-tags" %> declares data tag library of struts. The struts data tag is used to display the dynamic data. The tag <s:property value="message" /> and <s:property value="currentTime" /> calls the methods getMessage() and getCurrentTime() respectively of the Struts2HelloWorld action class and merges the values with response.
Developing Action (to interact with Model):
Now create Struts2HelloWorld.java and saves it
to the "struts2tutorial\WEB-INF\src\java\net\roseindia"
directory. This action class creates the message to be displayed on the screen.
Here is the code of Struts2HelloWorld.java:
package net.roseindia;

import com.opensymphony.xwork2.ActionSupport;

import java.util.Date;


public class Struts2HelloWorld extends ActionSupport {


  public static final String MESSAGE = "Struts 2 Hello World Tutorial!";


  public String execute() throws Exception {

  setMessage(MESSAGE);

  return SUCCESS;

  }


  private String message;


  public void setMessage(String message){

  this.message = message;

  }


  public String getMessage() {

  return message;

  }


  public String getCurrentTime(){

  return new Date().toString();

  }

}
Developing Controller Configuration File:
Struts 2 uses the struts.xml file for configuring the application. Create struts.xml file and save it in the "struts2tutorial\WEB-INF\src" directory with the following content.
| <?xml version="1.0" encoding="UTF-8" ?> <!DOCTYPE struts PUBLIC "-//Apache Software Foundation//DTD Struts Configuration 2.0//EN" "http://struts.apache.org/dtds/struts-2.0.dtd"> <struts> <constant name="struts.enable.DynamicMethodInvocation" value="false" /> <constant name="struts.devMode" value="true" /> <package name="roseindia" namespace="/roseindia" extends="struts-default"> <action name="HelloWorld" class="net.roseindia.Struts2HelloWorld"> <result>/pages/HelloWorld.jsp</result> </action> <!-- Add actions here --> </package> <!-- Add packages here --> </struts> |
The struts.xml file should be present in the class path of the application, you can either include it in the jar and place in the lib directory of the application or place it in the classes directory of the web application. In our application we are using ant build tool which is including it in the jar file.
Building the application
I am assuming that you have already installed ant build tool on your machine. Since we are using the ant built tool, building application by using is very easy. To build the application open command prompt and go to "struts2tutorial\WEB-INF\src" directory of the web application and issue the "ant" command. The ant build tool will compile the java file and create jar file "struts2tutorial.jar" into the lib directory of your web application. Here is the output of ant build tool:
C:\apache-tomcat-6.0.10\apache-tomcat-6.0.10\webapps\struts2tutorial\WEB-INF\src >ant Buildfile: build.xml clean: [delete] Deleting directory C:\apache-tomcat-6.0.10\apache-tomcat-6.0.10 \webapps\struts2tutorial\WEB-INF\classes[mkdir] Created dir: C:\apache- tomcat-6.0.10\apache-tomcat-6.0.10\webapps\struts2tutorial\WEB-INF\classesbr> prepare: resources: compile: [javac] Compiling 1 source file to C:\apache-tomcat-6.0.10\apache-tomcat- 6.0.10\webapps\struts2tutorial\WEB-INF\src\classes[jar] Building jar: C:\apache-tomcat- 6.0.10\apache-tomcat-6.0.10\webapps\struts2tutorial\WEB-INF\lib\struts2tutorial.jarbr> project: all: BUILD SUCCESSFUL Total time: 7 seconds C:\apache-tomcat-6.0.10\apache-tomcat-6.0.10\webapps\struts2tutorial\WEB-INF\src > |
Testing Struts 2 Hello World Application
In the above section we have compiled our application and now finally we will
test our application. To test the application start the tomcat server and type http://localhost:8080/struts2tutorial/
and then select "Run Struts 2 Hello World Application" from the list.
Here is the screen shot of our struts 2 tutorial home page:

Select "Run Struts 2 Hello World Application" link. Our first
application "Struts 2 Hello World" will look like the following:
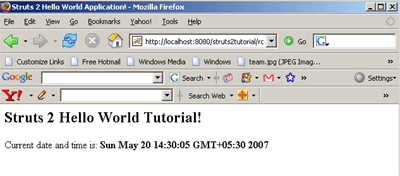
The application will display message "Struts 2 Hello World Tutorial!" along with current date and time of the server.
How application works?
Here is the brief description on how Struts 2 Hello World Application works:
Your browser sends a request to the web server for the URL http://localhost:8080/tutorial/HelloWorld.action.
- When you click on the "Run Struts 2 Hello World Application"
link, the browser sends a request for the url http://localhost:8080/struts2tutorial/roseindia/HelloWorld.action.
The container requests for the resource "HelloWorld.action". By
default web.xml file of struts blank application is configured to route all
the request for *.action through
org.apache.struts2.dispatcher.FilterDispatcher. Here is the configuration
from web.xml file:
<filter>
<filter-name>struts2</filter-name>
<filter-class>org.apache.struts2.dispatcher.FilterDispatcher</filter-class>
</filter>
<filter-mapping>
<filter-name>struts2</filter-name>
<url-pattern>/*</url-pattern>
</filter-mapping>
- Then the framework looks for the mapping for the
action "HelloWorld" and then framework instantiates the
appropriate class and calls the execute method. In this case action class is
Struts2HelloWorld. Here is the configuration file from struts.xml which
defines the action mapping:
<action name="HelloWorld" class="net.roseindia.Struts2HelloWorld">
<result>/pages/HelloWorld.jsp</result>
</action>
- Then the execute method sets the message and returns
SUCCESS.
public String execute() throws Exception {
setMessage(MESSAGE);
return SUCCESS;
}
Then framework determines which page is to be loaded if SUCCESS is returned. In our case framework tells the container to load HelloWorld.jsp and render the output.
In the struts 2 framework Actions are used to process the form and user request. The execute method of the action returns SUCCESS, ERROR, or INPUT value. Then based on these values framework tells the container to load and render the appropriate result.
- Container process the HelloWorld.jsp and generates
the output.
- Then the output in the HTML format is sent to the browser.
Download the application and source code:
You can download the application and source code of the tutorial and to save
your time and efforts spent on configuring the application. Click
here to download the code.
Our goal is to provide the working skeleton of the application based on ant tool. So you can download the application and then use ant tool to compile the java classes. Application is in the exploded directory structure and can be deployed as it is on tomcat server. If any of our visitor finds and problem please discuss it. We request you to share your experiences with us.