
Developing Login Form in Spring Web - Create form for user to input login credentials
In our example project login form is an important element of the application which allows the users to enter login credentials during the login process. This pages teaches you to make the login form which is still not connected to the database. In subsequent chapters of this tutorial series we will connect this to the database and validate the user against database.
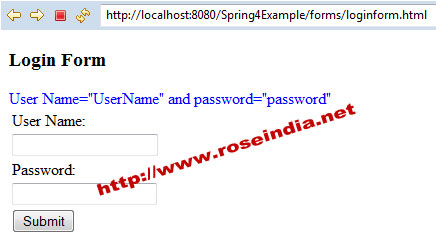
This example displays the two fields to the user:
- Login Name
- Password
- Button for Login
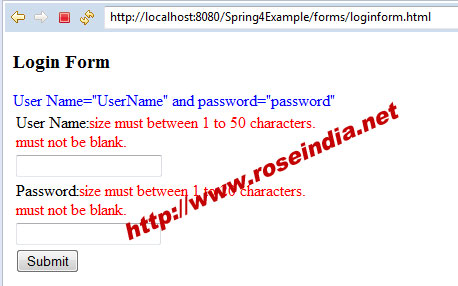
This example also validates the user input and if validation fails it displays the error to the user. Error is displayed in red color using the css style sheet of HTML. After completing this page you will be able to write form based application in Spring Web and validate the form using this framework.
Here is the screen shot of the Login Form:
Here is the video instruction of the Tutorial:
When user enters the data and clicks the Submit button, validation is performed and if there is any validation error, error message is displayed on the the form. Here is the screen shot of the error screen:
How to make Login Form in Spring MVC?
To make the Spring Login form we have to develop the following code in the application:
1. Login From (LoginForm.java)
The Login Form class is used to handle the form data and it contains the variables to handle the login form data. Here is the code of the java code:
package net.roseindia.form;
import javax.validation.constraints.Size;
import org.hibernate.validator.constraints.NotEmpty;
public class LoginForm {
	@NotEmpty
	@Size(min = 1, max = 50)
	private String userName;
	@NotEmpty
	@Size(min = 1, max = 20)
	private String password;

	public void setUserName(String userName) {
		this.userName = userName;
	}
	public String getUserName() {
		return userName;
	}
	public void setPassword(String password) {
		this.password = password;
	}
	public String getPassword() {
		return password;
	}
}
Above class file contains the validation code which validates the user input. The annotations are used for validations:
- @NotEmpty
- @Size(min = 1, max = 50)
2. Controller class (LoginController.java)
The Controller class is responsible for handling the request from client and performs the necessary operations. Here is the complete code of LoginController.java file:
package net.roseindia.controllers;
import org.springframework.stereotype.Controller;
import org.springframework.web.bind.annotation.RequestMapping;
import org.springframework.web.bind.annotation.RequestMethod;
import org.springframework.validation.BindingResult;
import java.util.Map;
import javax.validation.Valid;

import net.roseindia.form.LoginForm;

@Controller
@RequestMapping("loginform.html")
public class LoginController {
	@RequestMapping(method = RequestMethod.GET)
	public String showForm(Map model) {
		LoginForm loginForm = new LoginForm();
		model.put("loginForm", loginForm);
		return "loginform";
	}

	@RequestMapping(method = RequestMethod.POST)
	public String processForm(@Valid LoginForm loginForm, BindingResult result,
			Map model) {
		String userName = "UserName";
		String password = "password";
		if (result.hasErrors()) {
			return "loginform";
		}
		loginForm = (LoginForm) model.get("loginForm");
		if (!loginForm.getUserName().equals(userName)
				|| !loginForm.getPassword().equals(password)) {
			return "loginform";
		}
		model.put("loginForm", loginForm);
		return "loginsuccess";
	}
}
This class is annotated with the @Controller annotations which makes it a conroller class and this class handles the @RequestMapping("loginform.html") request.
3. Form JSP file (loginform.jsp)
This file displays the login form to the user. Here is the full code of the file:
<%@ page language="java" contentType="text/html; charset=ISO-8859-1"
	pageEncoding="ISO-8859-1"%>
<%@ taglib prefix="form" uri="http://www.springframework.org/tags/form"%>
<!DOCTYPE html PUBLIC "-//W3C//DTD HTML 4.01 Transitional//EN" "http://www.w3.org/TR/html4/loose.dtd">
<html>
<head>
<meta http-equiv="Content-Type" content="text/html; charset=ISO-8859-1">
<title>Spring4Example</title>
</head>
<body>
<h3>Login Form</h3>
<FONT color="blue">
User Name="UserName" and password="password"
</FONT>
<form:form action="loginform.html"  commandName="loginForm">
	<table>
		<tr>
			<td>User Name:<FONT color="red"><form:errors
				path="userName" /></FONT></td>
		</tr>
		<tr>
			<td><form:input path="userName" /></td>
		</tr>
		<tr>
			<td>Password:<FONT color="red"><form:errors
				path="password" /></FONT></td>
		</tr>
		<tr>
			<td><form:password path="password" /></td>
		</tr>
		<tr>
			<td><input type="submit" value="Submit" /></td>
		</tr>
	</table>
</form:form>
</body>
</html>
The form action is <form:form action="loginform.html" which actually submits the data to the controller class using the HTTP POST method. The tag <form:errors path="password" /> is used to display the error message on the form.
4. Login success (loginsuccess.jsp)
This jsp page displays the success message with the user name on the page. Full code of the file:
<%@ page language="java" contentType="text/html; charset=ISO-8859-1"
	pageEncoding="ISO-8859-1"%>
<%@ taglib prefix="core" uri="http://java.sun.com/jsp/jstl/core"%>
<!DOCTYPE html PUBLIC "-//W3C//DTD HTML 4.01 Transitional//EN" "http://www.w3.org/TR/html4/loose.dtd">
<html>
<head>
<meta http-equiv="Content-Type" content="text/html; charset=ISO-8859-1">
<title>Spring4Example</title>
</head>
<body>
<h3>Welcome <core:out value="${loginForm.userName}" /></h3>
<table>
	<tr>
		<td><a href="loginform.html">Back</a></td>
	</tr>
</table>
</body>
</html>
The tag <core:out value="${loginForm.userName}" /> displays the user name on the form.
5. Mapping all these components in dispatcher-servlet.xml
The code of this file already explained in the previous page.
6. Web application configuration in web.xml file.
The code of this file already explained in the previous page.
You can right click the project and easily run on the Tomcat sever from Eclipse.