MultiActionController example in


MultiActionController example in Spring 2.5 Web MVC
In this section we will learn about the MultiActionController class of Spring MVC. We will also show you the example to use this class. You can download MultiActionController example and run in Eclipse IDE or reconfigure the code in IDE of your choice.
Example of MultiActionController Class
MultiActionController class provides us a functionality that allow to bind the multiple request-handling methods in a single controller. The MultiActionController used MethodNameResolver or ParameterMethodNameResolver to find which method to be call when handling an incoming request. In this example we will discuss about how to use MultiActionController.
Step 1:
Now we will create a index.jsp that will have four hyperlinks to generates difference types of requests. The code of the index.jsp is:
|
<%@page contentType="text/html" pageEncoding="UTF-8"%> <html> <head> <title>Multi Action Controller Example</title> </head> <body> <h4>Multi Action Controller Example</h4> <a href="add.html" >Add</a> <br/> <a href="update.html" >Update</a><br/> <a href="edit.html" >Edit</a> <br/> <a href="remove.html" >Remove</a> </body> </html> |
Step 2:
Now we will configure the web.xml for DispatcherServlet. The code of the web.xml is:
|
<?xml version="1.0" encoding="UTF-8"?> <web-app xmlns:xsi="http://www.w3.org/2001/XMLSchema-instance" xmlns="http://java.sun.com/xml/ns/javaee" xmlns:web="http://java.sun.com/xml/ns/javaee/web-app_2_5.xsd" xsi:schemaLocation="http://java.sun.com/xml/ns/javaee
http: version="2.5"> <servlet> <servlet-name>dispatcher</servlet-name> <servlet-class>org.springframework.web.servlet.DispatcherServlet</servlet-class> 0 </servlet> <servlet-mapping> <servlet-name>dispatcher</servlet-name> 1 <url-pattern>*.html</url-pattern> </servlet-mapping> <welcome-file-list> 2 <welcome-file>index.jsp</welcome-file> </welcome-file-list> </web-app> 3 |
Step 3:
Now we will create a dispatcher-servlet.xml inside the /WEB-INF/ folder. The dispatcher-servlet.xml have the viewResolver that's provide a way to address views which enable you to render models in a browser without tying you to a specific view technology. The dispatcher-servlet.xml will have bean setting for provide the controller of these requests. The code for configure the MultiActionController in the dispatcher-servlet.xml is:
|
<bean name="/*.html" class="net.roseindia.web.MultiActionControllerExample" /> 4 |
The full code of the dispatcher-servlet.xml is:
|
<?xml version="1.0" encoding="UTF-8"?> <beans xmlns="http://www.springframework.org/schema/beans" 5 xmlns:xsi="http://www.w3.org/2001/XMLSchema-instance" xsi:schemaLocation="http://www.springframework.org/schema/beans
http: xmlns:p="http://www.springframework.org/schema/p"> 6 <bean id="viewResolver" class="org.springframework.web.servlet.view.InternalResourceViewResolver"> <property name="prefix"> 7 <value>/WEB-INF/jsp/</value> </property> <property name="suffix"> 8 <value>.jsp</value> </property> </bean> 9 <bean name="/*.html" class="net.roseindia.web.MultiActionControllerExample" /> </beans> |
Step 4: 0
Now we will create a showmessage.jsp in the /WEB-INF/jsp/ folder. It will be display the response(that's return by the controller class) for the user. The code of the showmessage.jsp is:
|
<%@ page language="java" contentType="text/html; charset=ISO-8859-1" pageEncoding="ISO-8859-1"%> 1 <html> <head> <title>Success Page</title> 2 </head> <body> ${message} 3 </body> </html> |
Step 5: 4
Now we will create a MultiActionControllerExample.java class inside the project src folder that extends the MultiActionController class. We will import "org.springframework.web.servlet.mvc.multiaction.MultiActionController" for extends MultiActionController class in MultiActionControllerExample.java. The MultiActionControllerExample.java class will have four methods for handle the user requests. The code of the MultiActionControllerExample.java is:
package net.roseindia.web;


import javax.servlet.http.HttpServletRequest;

import javax.servlet.http.HttpServletResponse;


import org.springframework.web.servlet.ModelAndView;

import org.springframework.web.servlet.mvc.multiaction.MultiActionController;


public class MultiActionControllerExample extends MultiActionController {


  public ModelAndView add(HttpServletRequest request,

  HttpServletResponse response) throws Exception {

  return new ModelAndView("showmessage", "message", "Add method called");

  }

  public ModelAndView update(HttpServletRequest request,

  HttpServletResponse response) throws Exception {

  return new ModelAndView("showmessage", "message", "Update method called");

  }

  public ModelAndView edit(HttpServletRequest request,

  HttpServletResponse response) throws Exception {

  return new ModelAndView("showmessage", "message", "Edit method called");

  }

  public ModelAndView remove(HttpServletRequest request,

  HttpServletResponse response) throws Exception {

  return new ModelAndView("showmessage", "message", "Remove method called");

  }

}
Step 6:
Now we will run this project and see the output like: 5
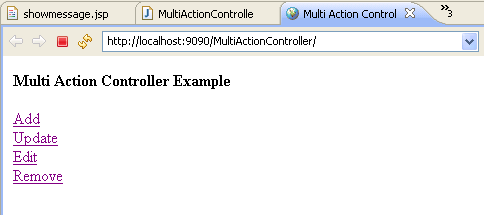
User can see four hyperlink in this page. User click on these links and see output like:
Click on Add link: 6

Click on Update link:
 7
7
Click on Edit link:

Click on Remove link: 8

Download Code