Spring 2.5 MVC File Upload
Spring 2.5 MVC File Upload
This tutorial explains how to upload file in Spring 2.5 MVC Framework.
Spring MVC module of Spring framework allows the developers to create web based application very easily. You can easily create file upload and form based application in Spring MVC. In this tutorial we are going to create an application which allows the user to upload a file on server.
Spring MVC framework built in feature to process the file upload.
This application is developed using Eclipse IDE and runs on Tomcat server. You can download the Spring MVC file upload example code at the end of this page.
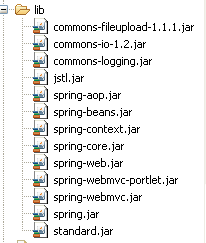
This tutorial create in Eclipse IDE and tomcat to run application. In this tutorial use following jar :

This tutorial applied following steps :
Step 1 :
First we create Dynamic web project "spring_fileupload". Now we create index.jsp file under WebContent folder. The code of index.jsp are given as:
|
<%@page contentType="text/html" pageEncoding="UTF-8"%> <html> <head> <title>File Upload</title> </head> <body> <center><a href="fileuploadform.html">File Upload Example</a></center> </body> </html> |
Step 2 :
Now create "FileUpload.java" class under src folder. The code of "FileUpload.java" given below :
package net.roseindia.model;

import org.springframework.web.multipart.MultipartFile;
public class FileUpload {
 MultipartFile file;
 public void setFile(MultipartFile file){
  this.file=file;
  }
 public MultipartFile getFile(){
  return file;
  }
 }
Step 3 :
Now create controller class "FileUploadController.java" in src folder . The code of "FileUploadController.java" given below :
package net.roseindia.controller;

import javax.servlet.http.HttpServletRequest;
import javax.servlet.http.HttpServletResponse;
import org.springframework.validation.BindException;
import org.springframework.web.multipart.MultipartFile;
import org.springframework.web.servlet.ModelAndView;
import org.springframework.web.servlet.mvc.SimpleFormController;
import java.io.InputStream;
import java.io.OutputStream;
import java.io.FileOutputStream;
import java.util.*;

import net.roseindia.model.FileUpload;;

public class FileUploadController extends SimpleFormController{

  @Override
  protected ModelAndView onSubmit(HttpServletRequest request,
		   HttpServletResponse response, Object command, BindException errors)
           throws Exception {
	 FileUpload fileUpload = (FileUpload)command;
	 MultipartFile multipartFile = fileUpload.getFile();
	 String fileName="";

	 // image type of file processing...
	 System.err.println("-------------------------------------------");
	 try {
	   InputStream inputStream = null;
	   OutputStream outputStream = null;
	   if (multipartFile.getSize() > 0) {
		  inputStream = multipartFile.getInputStream();
		  fileName = request.getRealPath("") +
		   "/images/"+ multipartFile.getOriginalFilename();
		  outputStream = new FileOutputStream(fileName);
		  int readBytes = 0;
		  byte[] buffer = new byte[10000];
		  while ((readBytes = inputStream.read(buffer, 0, 10000)) != -1) {
			 outputStream.write(buffer, 0, readBytes);
		   }
		  outputStream.close();
		  inputStream.close();
		}
	  } catch (Exception e) {
		 e.printStackTrace();
	  }
	 // ..........................................
	 Map model = new HashMap();
	 model.put("fileName", multipartFile.getOriginalFilename());
	 model.put("filepath", "images/"+multipartFile.getOriginalFilename());

	 return new ModelAndView(getSuccessView(), model);
   }
 }
Step 4 :
Now create validators class "FileUploadValidator.java" in src folder that use for validation file upload .The code of "FileUploadValidator.java" given below :
package net.roseindia.validators;

import org.springframework.validation.Errors;
import org.springframework.validation.Validator;
import net.roseindia.model.FileUpload;

public class FileUploadValidator implements Validator{
	@Override
	public boolean supports(Class clazz){
		return FileUpload.class.isAssignableFrom(clazz);
	 }
	@Override
	public void validate(Object target, Errors errors){
	  FileUpload fileUpload = (FileUpload)target;
	  if(fileUpload.getFile().getSize()==0){
		   errors.rejectValue("file", "error.empty.file",
		    "Please Select File.");
		}
	  if(fileUpload.getFile().getSize() > 10000){
		   errors.rejectValue("file", "error.empty.file",
		    "File size more than 10000 bytes ");
		}
	}
}
Step 5 :
Now Create "jsp" folder under "WebContent/WEB-INF" .Again create one jsp file "fileuploadform.jsp" in "jsp" folder . The code of "fileuploadform.jsp" given below :
|
<%@ taglib prefix="form" uri="http://www.springframework.org/tags/form"%> <html> <head> <script language="JavaScript"> function Validate(){ var image =document.getElementById("file").value; if(image!=''){ var checkimg = image.toLowerCase(); if (!checkimg.match(/(\.jpg|\.png|\.JPG|\.PNG|\.gif|\.GIF|\.jpeg|\.JPEG)$/)){ alert("Please enter Image File Extensions .jpg,.png,.jpeg,.gif"); document.getElementById("file").focus(); return false; } } return true; } </script> </head> <body> <h2 align="center">Spring 2.5 MVC File Upload Example</h2> <hr width=600 > <form:form
method="POST"
commandName="fileUpload"
enctype= <table align="center" > <tr> <td><form:label path="file">Please Select File:</form:label></td> <td><input type="file" name="file" id="file" /></td> </tr> <tr> <td></td> <td><font color="red"><form:errors path="file" /></font></td> </tr> <tr> <td></td> <td><input type="submit" value="File Upload" /></td> </tr> </table> </form:form> </body> </html> |
Step 5 :
Now create jsp file "fileuploadsuccess.jsp" under "WebContent/WEB-INF/jsp" . The code of "fileuploadsuccess.jsp" given below :
|
<%@ taglib prefix="form" uri="http://www.springframework.org/tags/form"%> <%@ taglib uri="http://java.sun.com/jsp/jstl/core" prefix="core"%> <html> <body> <h2 align="center">Spring 2.5 MVC File Upload Example</h2> <hr width=600 > <p align="center"> <img src="${filepath}" alt="Upload Image" /> <br> <core:out value="FileName :: "></core:out> <core:out value="${fileName}"></core:out> <core:out value="-Uploaded Successfully."></core:out> </p> </body> </html> |
Step 6:
The open file "web.xml" and modify as :
|
<?xml version="1.0" encoding="UTF-8"?> <web-app xmlns:xsi="http://www.w3.org/2001/XMLSchema-instance" xmlns="http://java.sun.com/xml/ns/j2ee" xmlns:web="http://java.sun.com/xml/ns/javaee/web-app_2_5.xsd" xsi:schemaLocation="http://java.sun.com/xml/ns/j2ee
http: version="2.5"> <servlet> <servlet-name>dispatcher</servlet-name> <servlet-class>org.springframework.web.servlet.DispatcherServlet</servlet-class> <load-on-startup>1</load-on-startup> </servlet> <servlet-mapping> <servlet-name>dispatcher</servlet-name> <url-pattern>*.html</url-pattern> </servlet-mapping> <welcome-file-list> <welcome-file>index.jsp</welcome-file> </welcome-file-list> </web-app> |
Step 7:
Now create "dispatcher-servlet.xml" file under "WebContent/WEB-INF/jsp" directory. The code of "dispatcher-servlet.xml" file given below :
|
<?xml version="1.0" encoding="UTF-8"?> <beans xmlns="http://www.springframework.org/schema/beans" xmlns:xsi="http://www.w3.org/2001/XMLSchema-instance" xsi:schemaLocation="http://www.springframework.org/schema/beans
http: xmlns:p="http://www.springframework.org/schema/p"> <bean id="multipartResolver" class="org.springframework.web.multipart.commons.CommonsMultipartResolver"/> <bean id="viewResolver" class="org.springframework.web.servlet.view.InternalResourceViewResolver"> <property name="prefix"> <value>/WEB-INF/jsp/</value> </property> <property name="suffix"> <value>.jsp</value> </property> </bean> <bean id="urlMapping" class="org.springframework.web.servlet.handler.SimpleUrlHandlerMapping"> <property name="interceptors"> <list> <ref local="localeChangeInterceptor"/> </list> </property> <property name="urlMap"> <map> <entry key="/fileuploadform.html"> <ref bean="fileUploadFormController"/> </entry> </map> </property> </bean> <bean id="fileUploadValidator" class="net.roseindia.validators.FileUploadValidator"/> <bean id="fileUploadFormController" class="net.roseindia.controller.FileUploadController"> <property name="sessionForm"><value>false</value></property> <property name="commandName"><value>fileUpload</value></property> <property name="commandClass"><value>net.roseindia.model.FileUpload</value></property> <property name="validator"><ref bean="fileUploadValidator"/></property> <property name="formView"><value>fileuploadform</value></property> <property name="successView"><value>fileuploadsuccess</value></property> </bean> <bean
id="localeChangeInterceptor"
class= <property name="paramName" value="hl"/> </bean> <bean
id="localeResolver"
class= </beans> |
Step 8 :
When run application "spring_fileupload" display output as :

When click hyperlink "File Upload Example" display output as :

When click button "File Upload" without select any file display error message as

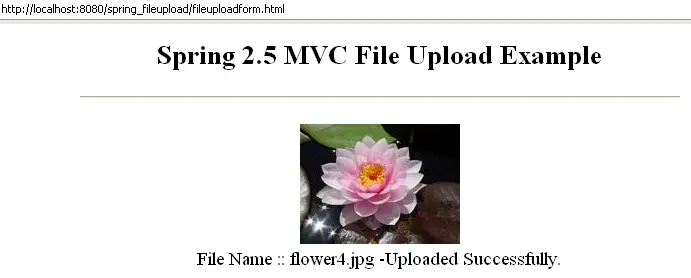
If select any image file as *.png or *. jpg or *.jpeg or *.gif and click button "File Upload" , then display uploaded file as :

Download Code


