
Video tutorial of creating Struts 2 Hello World Annotation Example in Eclipse IDE
In this tutorial we will use our previous example "Creating Hello World application in Struts 2 version 2.3.15.1" and modify it and add the annotation for and then run the example from Eclipse IDE. Now Struts 2 supports action configuration with the help of Conventions and Annotations. Here we are using Annotations to configure the HelloWorld action class.
We use modify the code of our previous example and then run on the Eclipse IDE. You can download the code of previous example from our tutorial page Creating Hello World application in Struts 2 version 2.3.15.1.
We will use the Eclipse IDE to create the application and then run it on Tomcat 7 server. All work are done from the Eclipse IDE.
How annotation works in Struts 2?
Struts 2 Convention Plugin is responsible for configuring the Annotated classes as action and handle the action. The Convention Plugin was first added in the Struts version 2.1 by replacing the earlier Codebehind Plugin and Zero Config plugins. The Convention Plugin comes with many handy features and eases the development of Struts 2 based web applications. Here we are discussing the features of Struts 2 Convention Plugin. Following are the features of Struts 2 Convention Plugin:
- No configuration file is needed. So, we don't have any requirement to
have struts.xml file in the project class path.
- We have a well defined naming conventions for the action class location.
The Struts 2 Convention Plugin scans the annotated classes packaged in the
packages named "struts, struts2,
action or actions". In our example Action class in
present in the net.roseindia.action package.
Convention plugin will scan the class and register the action "HelloWorldAction?
as HelloWorld.action.
- Here we can configure the results (JSP, FreeMarker, etc) location by
using annotations in the action class. For example in our example we have
used @Result annotation to configure in our example. Here is the
configuration annotations @Result(name="success",
location="/example/HelloWorld.jsp".
- Well defined rule for Class name to URL naming convention. For example
the LoginAction.action will be changed to
login.action. You can also specify your own custom URL name using
the annotation @Action(value="/HelloWorld",...
annotation.
- Now SEO compliant URLs are supported for example MyAction will be
changed to my-action.
- You can use the annotations to override the default Action name
- You can override Namespace using annotations.
- You can override XWork package using annotations
Here is the Video tutorial of creating Struts 2 Hello World Annotation Example:
Let's Starts developing the code:
Here we won't create any struts.xml file in the project. The Struts 2 Convention Plugin will configure the action.
This section will help you in writing your first Struts 2 applications using Eclipse IDE. We will explain you the process of writing first Hello World example in Struts 2 using Annotations and deploy on Tomcat 7 and test on browser.
Steps to Create Struts 2 Hello World application using Annotations

Here is the step by step description of making Struts 2 Hello World example using Annotations.
Step 1: Download the Struts 2.3.15.1 and extract the zip file. See the tutorial Downloading and installing Struts 2 2.3.15.1.
Step 2: You should download and install latest version of Eclipse IDE on your computer. Also configure the Tomcat 7 on Eclipse IDE so that you can run the examples from the Eclipse IDE itself. If you don't know how to configure Tomcat 7 with Eclipse IDE then just check the tutorial Tomcat 7 in Eclipse Helios.
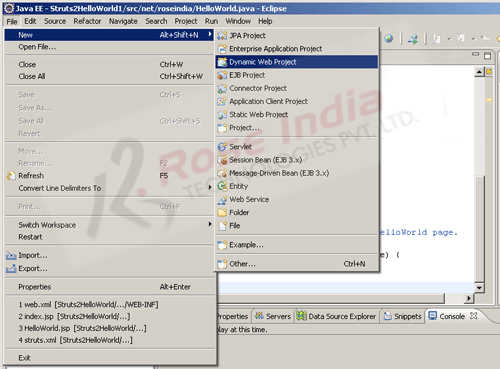
Step 3: Open the Eclipse IDE and create a dynamic web project as shown below:
Step 4: Enter the name of the project "Struts2HelloWorldAnnotation", provide the "Project location", click on the next button.
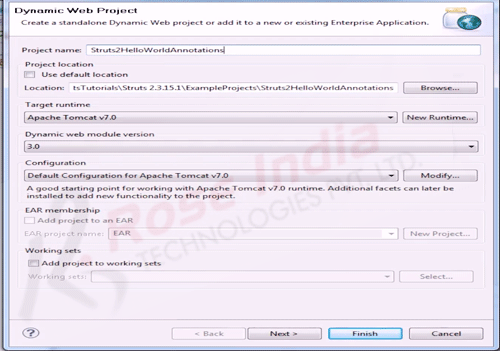
Wizard will ask you to generate the web.xml file, click on check box and follow the wizard to finish the wizard. You can see all the steps in the video tutorial above.
Step 5: Copy the jar files into the lib directory ("WebContent/WEB-INF/lib") of you web application.
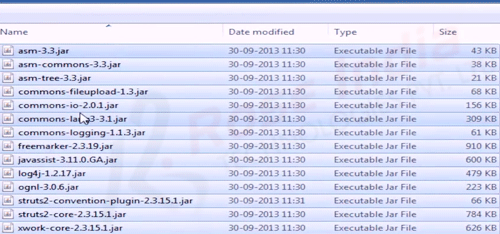
Please note that we have copied struts2-convention-plugin-2.3.15.1.jar into the project. This is the jar file of the Struts 2 Convention plugin which is responsible for registering Annotated class a action.
Step 6: Create a new package "net.roseindia.action" and then copy the "HelloWorldAction.java" along with properties files into this package as shown below:
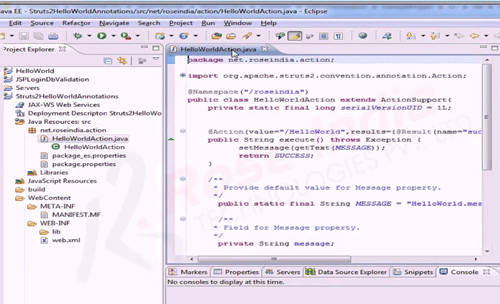
Here is the source code of "HelloWorldAction.java" class file:
package net.roseindia.action;

import org.apache.struts2.convention.annotation.Action;
import org.apache.struts2.convention.annotation.Namespace;
import org.apache.struts2.convention.annotation.Result;
import com.opensymphony.xwork2.ActionSupport;

@Namespace("/roseindia")
public class HelloWorldAction extends ActionSupport{
private static final long serialVersionUID = 1L;


@Action(value="/HelloWorld",results={@Result(name="success",
   location="/example/HelloWorld.jsp")})
public String execute() throws Exception {
setMessage(getText(MESSAGE));
return SUCCESS;
}

/**
* Provide default value for Message property.
*/
public static final String MESSAGE = "HelloWorld.message";

/**
* Field for Message property.
*/
private String message;

/**
* Return Message property.
*
* @return Message property
*/
public String getMessage() {
return message;
}

/**
* Set Message property.
*
* @param message Text to display on HelloWorld page.
*/
public void setMessage(String message) {
this.message = message;
}
}
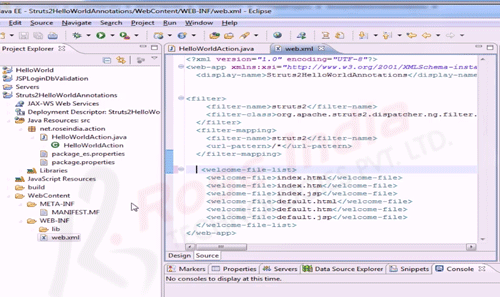
Step 7: Add the following code into web.xml file:
<?xml version="1.0" encoding="UTF-8"?>
<web-app xmlns:xsi="http://www.w3.org/2001/XMLSchema-instance"
    xmlns="http://java.sun.com/xml/ns/javaee" xmlns:web="http://java.sun.com/xml/ns/javaee/web-app_2_5.xsd"
    xsi:schemaLocation="http://java.sun.com/xml/ns/javaee http://java.sun.com/xml/ns/javaee/web-app_3_0.xsd"
    id="WebApp_ID" version="3.0">
<display-name>HelloWorldAnnotation</display-name>

<filter>
<filter-name>struts2</filter-name>
<filter-class>org.apache.struts2.dispatcher.ng.filter.StrutsPrepareAndExecuteFilter</filter-class>
</filter>
<filter-mapping>
<filter-name>struts2</filter-name>
<url-pattern>/*</url-pattern>
</filter-mapping>

<welcome-file-list>
<welcome-file>index.html</welcome-file>
<welcome-file>index.htm</welcome-file>
<welcome-file>index.jsp</welcome-file>
<welcome-file>default.html</welcome-file>
<welcome-file>default.htm</welcome-file>
<welcome-file>default.jsp</welcome-file>
</welcome-file-list>
</web-app>
In the above web.xml file we have configured the StrutsPrepareAndExecuteFilter as Servlet filter.
Below is the screen shot of the Eclipse project:
Step 8: Now you should add the index.jsp into project as shown below: 0
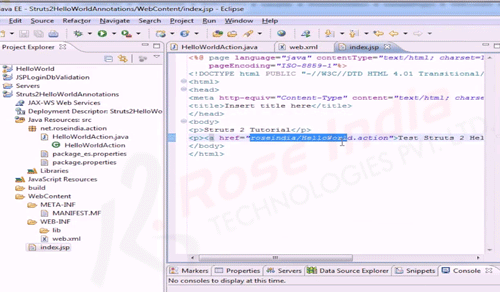
Here is the code of index.jsp file which is added into the WebContent folder:
<%@ page language="java" contentType="text/html; charset=ISO-8859-1"
pageEncoding="ISO-8859-1"%>
<!DOCTYPE html PUBLIC "-//W3C//DTD HTML 4.01 Transitional//EN"
    "http://www.w3.org/TR/html4/loose.dtd">
<html>
<head>
<meta http-equiv="Content-Type" content="text/html; charset=ISO-8859-1">
<title>Insert title here</title>
</head>
<body>
<p>Struts 2 Tutorial</p>
<p><a href="roseindia/HelloWorld.action">Test Struts 2 Hello World example!!</a>
</body>
</html>
Step 9: Create a new folder "example" under "WebContent" and then copy the "HelloWorld.jsp" file from the downloaded source code as shown below: 1
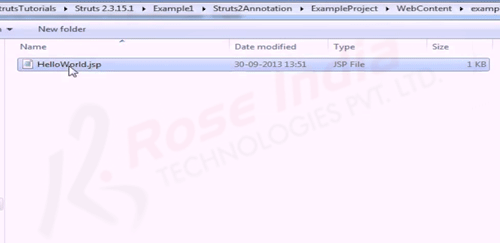
Here is the code of "HelloWorld.jsp" page:
<%@ page language="java" contentType="text/html; charset=ISO-8859-1"
pageEncoding="ISO-8859-1"%>
<%@ taglib prefix="s" uri="/struts-tags" %>
<!DOCTYPE html PUBLIC "-//W3C//DTD HTML 4.01 Transitional//EN"
  "http://www.w3.org/TR/html4/loose.dtd">
<html>
<head>
<meta http-equiv="Content-Type" content="text/html; charset=ISO-8859-1">
<title><s:text name="HelloWorld.message"/></title>
</head>
<body>
<h2><s:property value="message"/></h2>
<a href="/HelloWorldAnnotation/">Back to Index page</a>
</body>
</html>
We have used <s:property value="message"/> to print the value of message variable from the Action class. 2
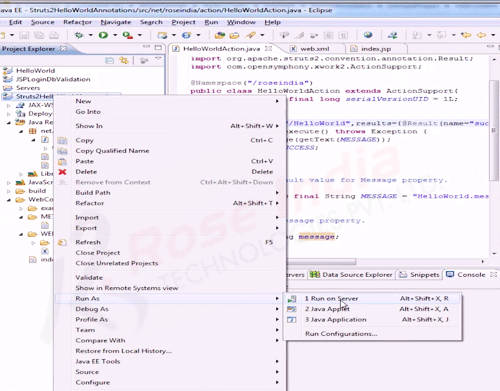
Step 10: We are done with the application development process. Now run the application right click the Project in the project explorer window and then select "Run As" -> "Run on Server" as shown below:
Here is the screen shot of the running code which is displaying the "Hello World" message on screen. 3
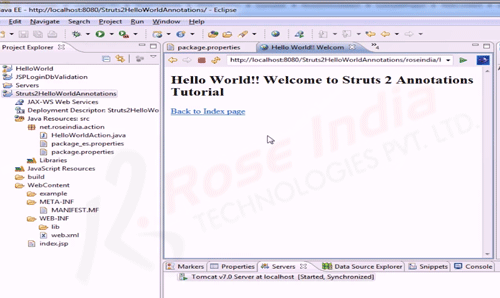
We have successfully developed and tested the Hello World application using Java annotations.
Download the code of the application discussed here. 4
Read more Struts 2 version 2.3.15.1 tutorials and master Struts 2 latest version.