
Learn to create Hibernate 5 Annotation Example
This video instruction will teach you to create a Java Project in Eclipse and then develop it to make a working Hibernate 5 annotation based example which can insert data into MySQL database.
We have also explained you the source code for getting all the data using Hibernate 5 criteria query from database table. Hibernate 5 framework comes with many improvements and new features making it another major version of Hibernate.
Hibernate 5 now supports the Big Data based database server NoSQL for persisting the data. So, Hibernate developers can use their existing skills in the field of Big Data.
In this first example of Hibernate 5, we are teaching you to create a simple Hibernate 5 application. You can take it further and keep on practicing with the HQL, native Query, Association and joins. This tutorial will give you a quick start in Hibernate 5 application development. So, lets get started with Hibernate 5 ORM framework.
What you need?
For completing this tutorial following software/server is required:
- MySQL Database - Database back end for our project. Check
the tutorial
How to download and install MySQL on Windows 10? for more
information on downloading and installing MySQL.
- Java 8 (installed and configured) - Java 8 for using the
latest features add in Hibernate 5. Check Installing
JDK 8 on Windows 10 and configuring the settings for more
information on installing configuring JDK.
- Eclipse IDE - For easy development, testing and running the projects. Eclipse is free IDE and you can easily download and install it for development.
Complete video instruction of Creating Hibernate 4 Annotation example
Following video tutorial teaches you to create Hibernate 4 annotation example in Eclipse ID back with MySQL Database:
Create MySQL Database and Table
Database: hibernate5
We have to create a database in MySQL database and then add a new table in the database. Here is the query to create database:
create database hibernate5;
connect hibernate5;
Table: employee
After this connect to newly created database and then run following command to create table:
CREATE TABLE `employee` (
`id` int(11) NOT NULL AUTO_INCREMENT,
`emp_name` varchar(100) DEFAULT NULL,
`emp_address` varchar(500) DEFAULT NULL,
`emp_mobile_nos` varchar(100) DEFAULT NULL,
PRIMARY KEY (`id`)
) ENGINE=InnoDB DEFAULT CHARSET=latin1;

Create Eclipse project
Now create a "Java Project" in Eclipse, Video tutorial details you the steps for creation of the project.
For creating a new project in Eclipse select File->New -> Java project from the Eclipse menu.
Following screen shot shows the creation of eclipse project:
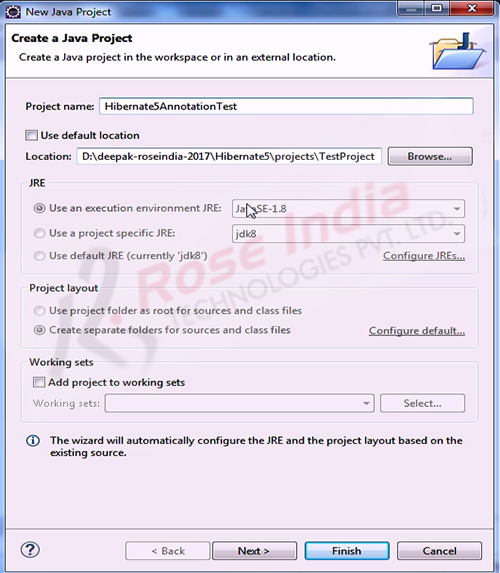
Enter the project name "Hibernate5AnnotationTest", enter the location directory and then click on the "Finish" button. This will create a Java Project in Eclipse.
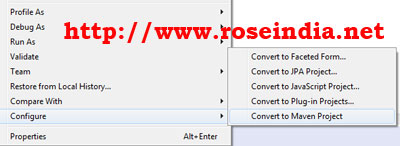
Convert Java project to Maven Project in Eclipse
Now convert the Java project to Maven Project in Eclipse, for this right click the project and then select Configure-> Convert to Maven Project as shown below:
The it will open a wizard, leave all the data as it is and click "Finish" button. This will convert the project into Maven project.
Add Hibernate 5 dependency in pom.xml
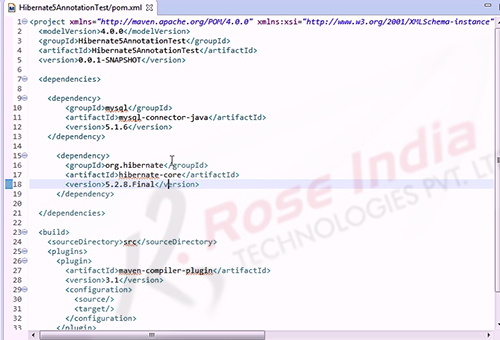
Now we will add the MySQL and Hibernate 5 dependency in pom.xml file. Open the file in edit mode and add following dependency:
  <dependencies>
  	<dependency>
	    <groupId>mysql</groupId>
	    <artifactId>mysql-connector-java</artifactId>
	    <version>5.1.6</version>
	</dependency>

	  <dependency>
	    <groupId>org.hibernate</groupId>
	    <artifactId>hibernate-core</artifactId>
	    <version>5.2.8.Final</version>
	  </dependency>
  </dependencies>
Here is the screen shot from Eclipse:
Here is the full code of pom.xml file used in the project:
<project xmlns="http://maven.apache.org/POM/4.0.0"
	xmlns:xsi="http://www.w3.org/2001/XMLSchema-instance"
	xsi:schemaLocation="http://maven.apache.org/POM/4.0.0 http://maven.apache.org/xsd/maven-4.0.0.xsd">
  <modelVersion>4.0.0</modelVersion>
  <groupId>Hibernate5Annotation</groupId>
  <artifactId>Hibernate5Annotation</artifactId>
  <version>0.0.1-SNAPSHOT</version>
  <dependencies>

	<dependency>
	    <groupId>mysql</groupId>
	    <artifactId>mysql-connector-java</artifactId>
	    <version>5.1.6</version>
	</dependency>

	  <dependency>
	    <groupId>org.hibernate</groupId>
	    <artifactId>hibernate-core</artifactId>
	    <version>5.2.8.Final</version>
	  </dependency>

  </dependencies>

  <build>
    <sourceDirectory>src</sourceDirectory>
    <resources>
      <resource>
        <directory>src</directory>
        <excludes>
          <exclude>**/*.java</exclude>
        </excludes>
      </resource>
    </resources>
    <plugins>
      <plugin>
        <artifactId>maven-compiler-plugin</artifactId>
        <version>3.1</version>
        <configuration>
          <source>1.8</source>
          <target>1.8</target>
        </configuration>
      </plugin>
    </plugins>
  </build>
</project>
After adding Hibernate 5 and MySQL dependency, maven will download the jar files of Hibernate 5 and MySQL JDBC Driver and use in the project.
Create Model class
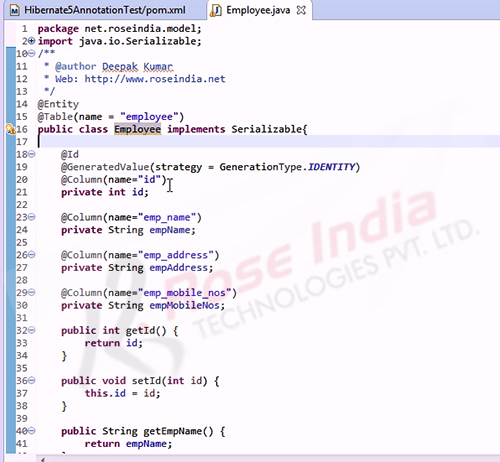
Now we will create the model class in project for mapping the Java to database table. Model class is simply Plain Old Java class (POJO) with appropriate Hibernate annotation for mapping definition.
POJO class in Hibernate will define the mapping of Java objects with database table and its columns. You can read more at Hibernate create POJO classes.
Here is the full code of our Model or POJO class: 0
package net.roseindia.model;
import java.io.Serializable;

import javax.persistence.Column;
import javax.persistence.Entity;
import javax.persistence.GeneratedValue;
import javax.persistence.GenerationType;
import javax.persistence.Id;
import javax.persistence.Table;
/**
 * @author Deepak Kumar
 * Web: http://www.roseindia.net
 */
@Entity
@Table(name = "employee")
public class Employee implements Serializable{

	@Id
	@GeneratedValue(strategy = GenerationType.IDENTITY)
	@Column(name="id")
	private int id;

	@Column(name="emp_name")
	private String empName;

	@Column(name="emp_address")
	private String empAddress;

	@Column(name="emp_mobile_nos")
	private String empMobileNos;

	public int getId() {
		return id;
	}

	public void setId(int id) {
		this.id = id;
	}

	public String getEmpName() {
		return empName;
	}

	public void setEmpName(String empName) {
		this.empName = empName;
	}

	public String getEmpAddress() {
		return empAddress;
	}

	public void setEmpAddress(String empAddress) {
		this.empAddress = empAddress;
	}

	public String getEmpMobileNos() {
		return empMobileNos;
	}

	public void setEmpMobileNos(String empMobileNos) {
		this.empMobileNos = empMobileNos;
	}

}
Following annotation is used to map it to table:
@Entity
@Table(name = "employee")
Following annotation defines the primary key and the primary key generation strategy: 1
@Id
@GeneratedValue(strategy = GenerationType.IDENTITY)
@Column(name="id")
private int id;
Other variables in the Java class is mapped to appropriate columns in table with @Column annotations.
Here is the screen shot from the Eclipse project: 2
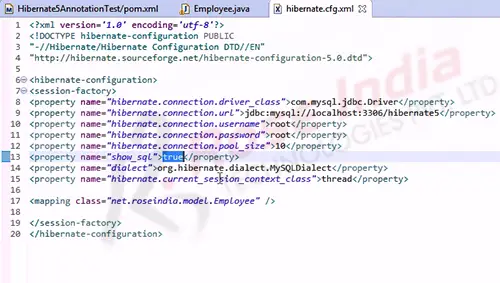
Hibernate 5 hibernate.cfg.xml file in the project
Now we will create the hibernate.cfg.xml file in the project. Here is the full source code of hibernate.cfg.xml file:
<?xml version='1.0' encoding='utf-8'?>
<!DOCTYPE hibernate-configuration PUBLIC
"-//Hibernate/Hibernate Configuration DTD//EN"
"http://hibernate.sourceforge.net/hibernate-configuration-5.0.dtd">

<hibernate-configuration>
<session-factory>
<property name="hibernate.connection.driver_class">com.mysql.jdbc.Driver</property>
<property name="hibernate.connection.url">jdbc:mysql://localhost:3306/hibernate5</property>
<property name="hibernate.connection.username">root</property>
<property name="hibernate.connection.password">root</property>
<property name="hibernate.connection.pool_size">10</property>
<property name="show_sql">true</property>
<property name="dialect">org.hibernate.dialect.MySQLDialect</property>
<property name="hibernate.current_session_context_class">thread</property>

<mapping class="net.roseindia.model.Employee" />

</session-factory>
</hibernate-configuration>
Above configuration file is used at the time of Hibernate 5 bootstrap. We have defined the MySQL database connection information and the class mapping. Following code actually loads the model class at bootstrapping time: 3
<mapping class="net.roseindia.model.Employee" />
If you have multiple model class in your project then you should add all the class files here.
Here is the screen grab from Eclipse of our project: 4
You can get the source code from the above or from our complete project which can be downloaded from the link provide at the end of this tutorial.
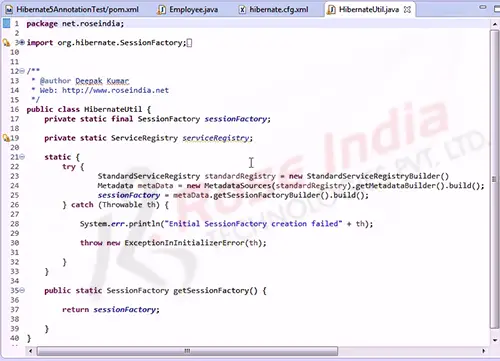
Create utility class for Hibernate 5 bootstrap
Now we have to create a class for bootstrapping the Hibernate 5 and get the session factory object for the project. 5
As a part of bootstrap process we will initialize the object of SessionFactory in Hibernate. The SessionFactory will be used by Java program to get the session.
Here is the full code of utility class:
package net.roseindia;

import org.hibernate.SessionFactory;
import org.hibernate.boot.Metadata;
import org.hibernate.boot.MetadataSources;
import org.hibernate.boot.registry.StandardServiceRegistry;
import org.hibernate.boot.registry.StandardServiceRegistryBuilder;
import org.hibernate.cfg.Configuration;
import org.hibernate.service.ServiceRegistry;


/**
 * @author Deepak Kumar
 * Web: http://www.roseindia.net
 */
public class HibernateUtil {
	private static final SessionFactory sessionFactory;

	private static ServiceRegistry serviceRegistry;

	static {
		try {
		StandardServiceRegistry standardRegistry =
		new StandardServiceRegistryBuilder().configure("hibernate.cfg.xml").build();
		Metadata metaData =
		new MetadataSources(standardRegistry).getMetadataBuilder().build();
			sessionFactory = metaData.getSessionFactoryBuilder().build();
		} catch (Throwable th) {

			System.err.println("Enitial SessionFactory creation failed" + th);
			throw new ExceptionInInitializerError(th);

		}
	}
	public static SessionFactory getSessionFactory() {

		return sessionFactory;

	}
}
You will find all the steps in the video tutorial attached to this tutorial. 6
The bootstrapping process in Hibernate 5 is different from the previous version of Hibernate. So, if you are migrating your project from old version of Hibernate then use the above code in new version of project.
Here is the screen shot of the utility class used in the project:
 7
7
You can see the full code in the screen shot of the Eclipse IDE.
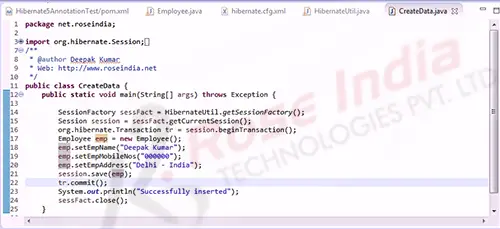
Create program to add the data
Now everything is ready, we will just add the following code in our project:
package net.roseindia;

import org.hibernate.Session;
import org.hibernate.SessionFactory;

import net.roseindia.model.*;
/**
 * @author Deepak Kumar
 * Web: http://www.roseindia.net
 */
public class CreateData {
	public static void main(String[] args) throws Exception {

	SessionFactory sessFact = HibernateUtil.getSessionFactory();
	Session session = sessFact.getCurrentSession();
	org.hibernate.Transaction tr = session.beginTransaction();
	Employee emp = new Employee();
	emp.setEmpName("Deepak Kumar");
	emp.setEmpMobileNos("000000");
	emp.setEmpAddress("Delhi - India");
	session.save(emp);
	tr.commit();
	System.out.println("Successfully inserted");
	sessFact.close();
	}

}
Above code gets the SessionFactory from the utility class, then gets an object of Session. The Session object provides the methods for interacting with the database. In the example we have used the save() method which is used to save an object. In our case POJO object is Employee, in the example we are creating object of Employee and populating it with data. 8
Finally calling the save() method on the session object to save the data into database.
The commit method actually persists the database into database permanently.
If you run the code from Eclipse it will add new record in database. After running you should verify data in database table. 9
Following is the screen shot from Eclipse Project:
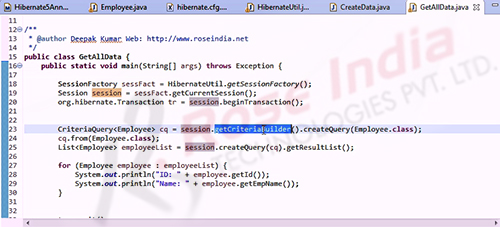
Listing data from database in Hibernate 5
Now we will write another program for getting all the data from database table in our Hibernate 5 project. We have just added data using above code now use the following code to get all the data from database: 0
package net.roseindia;

import java.util.Iterator;
import java.util.List;

import org.hibernate.Criteria;
import org.hibernate.Session;
import org.hibernate.SessionFactory;
import javax.persistence.criteria.CriteriaQuery;
import net.roseindia.model.*;

/**
 * @author Deepak Kumar Web: http://www.roseindia.net
 */
public class GetAllData {
	public static void main(String[] args) throws Exception {

	SessionFactory sessFact = HibernateUtil.getSessionFactory();
	Session session = sessFact.getCurrentSession();
	org.hibernate.Transaction tr = session.beginTransaction();


	CriteriaQuery cq = session.getCriteriaBuilder().createQuery(Employee.class);
	cq.from(Employee.class);
	List employeeList = session.createQuery(cq).getResultList();

	for (Employee employee : employeeList) {
		System.out.println("ID: " + employee.getId());
		System.out.println("Name: " + employee.getEmpName());
	}


	tr.commit();
	System.out.println("Data printed");
	sessFact.close();
	}
}
In the above code we have used the CriteriaQuery for getting data from database. The CriteriaQuery of Hibernate allows the developers to selectively get data from database based on certain conditions. In the above example we are simply getting all the data without any restriction. If you run the code it will print all the data from database.
Here is the screen of CriteriaQuery example from our Eclipse Project:
 1
1
After running above code in Eclipse, you see the ID and Name data printed on the console.
In this video tutorial we have learned how to create first Hibernate 5 annotation based project in Eclipse.
Download the source code of Hibernate 5 Annotation example. 2
What next? Check all the Hibernate 5 tutorials.