
Spring 4 MVC Login Example: Database driven login form using Spring MVC and the Hibernate ORM framework.
In this last tutorial we have discussed how to make Login form application in Spring MVC 4. In this section we will teach you how to validate the user against database. MySQL database server is used to store the login details of the user. Hibernate ORM framework is used to access the database.
Topics covered in this tutorial:
- Creating database on the MySQL server, Creating table and populating the records
- Adding Hibernate and MySQL JDBC driver dependencies in the Maven project
- Creating form class
- Creating the controller class
- Writing JSP files
- Testing and running the application
Perquisite:
- You should have knowledge of web application development with Java technologies
- You should have sound knowledge of Spring framework
- Experience with MySQL database is a must
Software's:
- JDK 7 or above
- Maven 3
- Code editor
Here is the video tutorial of "Login Form using Spring MVC and Hibernate":
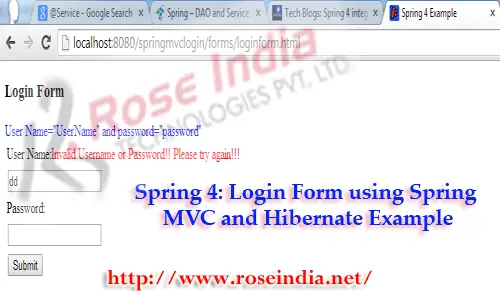
In this application following login screen will be displayed for entering the username and password. User can enter the login details and press the "Submit" button to proceed for login. If the user is validated against database, welcome message will be displayed else it will display the error message. Following is the screen shot of the login screen:
We are using the code discussed in the tutorial Spring 4 MVC Login form without database. Here are we are adding/modifying the code for validating the user against the data stored in the MySQL database server. You can download the code from the above tutorial and follow the instruction to add the database capabilities.
So, let's get started with the development of the application.
Step 1: Create Database, table and populate the sample records:
Create a database named 'springexamples' using following sql:
create database sprinexamples;
Create a table called 'users' with the help of following sql:
CREATE TABLE `users` (
          `id` int(11) NOT NULL AUTO_INCREMENT,
          `user_name` varchar(50) NOT NULL,
          `user_password` varchar(50) NOT NULL,
          PRIMARY KEY (`id`)
) ENGINE=InnoDB DEFAULT CHARSET=latin1;
Add two records with the help of following sql in the users table:
insert into users (user_name,user_password) values ('deepak','deepak');
insert into users (user_name,user_password) values ('john','john');
Now our database is ready, so the next step is to create the model class.
Step 2: Create model class
Now we will create the model class Users.java which will map to the users table of the database. Here is the complete code of the Users.java class:
package net.roseindia.model;
/*
@Author: Deepak Kumar
Check more tutorials at http://www.roseindia.net
*/
import java.util.List;
import java.io.Serializable;
import java.sql.Timestamp;

import javax.persistence.Basic;
import javax.persistence.Entity;
import javax.persistence.GeneratedValue;
import javax.persistence.Id;
import javax.persistence.Table;
import javax.persistence.Column;
import javax.persistence.FetchType;
import javax.persistence.JoinColumn;
import javax.persistence.JoinColumns;
import javax.persistence.ManyToOne;
import javax.persistence.OneToMany;
import javax.persistence.Transient;
import javax.persistence.Embeddable;

@Entity
@Table(name = "users")
@SuppressWarnings("serial")
public class Users implements Serializable {


	@Id
	@GeneratedValue
	@Column(name = "id", length = 11 )
	private Long id;

	@Column(name = "user_name")
	String userName;

	@Column(name = "user_password")
	String userPassword;


	public Long getId() {
		return id;
	}


	public void setId(Long id) {
		this.id = id;
	}


	public String getUserName() {
		return userName;
	}

	public void setUserName(String userName) {
		this.userName = userName;
	}

	public String getUserPassword() {
		return userPassword;
	}

	public void setUserPassword(String userPassword) {
		this.userPassword = userPassword;
	}
}
This Entity is mapped to the "users" table.
Step 3: Create DAO Classes
Here is the code of the DAO Interface (LoginDAO.java):
package net.roseindia.dao;
/*
@Author: Deepak Kumar
Check more tutorials at http://www.roseindia.net
*/
import net.roseindia.model.*;

public interface LoginDAO{
       public boolean checkLogin(String userName, String userPassword);
}
Here is the code of the implementation class (LoginDAOImpl.java):
package net.roseindia.dao;
/*
@Author: Deepak Kumar
Check more tutorials at http://www.roseindia.net
*/
import net.roseindia.model.*;

import org.springframework.stereotype.Component;
import org.springframework.stereotype.Repository;

import javax.annotation.Resource;

import org.hibernate.Session;
import org.hibernate.SessionFactory;
import org.hibernate.Query;
import java.util.List;

@Repository("loginDAO")
public class LoginDAOImpl implements LoginDAO{


       @Resource(name="sessionFactory")
       protected SessionFactory sessionFactory;

       public void setSessionFactory(SessionFactory sessionFactory) {
              this.sessionFactory = sessionFactory;
       }

       protected Session getSession(){
              return sessionFactory.openSession();
       }

       public boolean checkLogin(String userName, String userPassword){
			System.out.println("In Check login");
			Session session = sessionFactory.openSession();
			boolean userFound = false;
			//Query using Hibernate Query Language
			String SQL_QUERY =" from Users as o where o.userName=? and o.userPassword=?";
			Query query = session.createQuery(SQL_QUERY);
			query.setParameter(0,userName);
			query.setParameter(1,userPassword);
			List list = query.list();

			if ((list != null) && (list.size() > 0)) {
				userFound= true;
			}

			session.close();
			return userFound;
       }
}
Here we have used the Hibernate Query Language (HQL) for validation the user against database. This is class also registered to the repository with the help of @Repository("loginDAO") tag.
Step 4: Create Login Service classes:
Service class is called in the controller class which in turns calls the methods of DAO classes for validating the user. Here is the code of interface (LoginService.java):
package net.roseindia.service;
/*
@Author: Deepak Kumar
Check more tutorials at http://www.roseindia.net
*/
import net.roseindia.model.*;

public interface LoginService{
       public boolean checkLogin(String userName, String userPassword);
}
In the above interface the checkLogin(..) method is defined which will be implemented in the LoginServiceImpl class.
package net.roseindia.service;
/*
@Author: Deepak Kumar
Check more tutorials at http://www.roseindia.net
*/
import org.springframework.beans.factory.annotation.Autowired;
import org.springframework.stereotype.Service;

import net.roseindia.dao.*;


@Service("loginService")
public class LoginServiceImpl implements LoginService {

	 @Autowired
	 private LoginDAO loginDAO;

	   public void setLoginDAO(LoginDAO loginDAO) {
              this.loginDAO = loginDAO;
       }

       public boolean checkLogin(String userName, String userPassword){
              System.out.println("In Service class...Check Login");
              return loginDAO.checkLogin(userName, userPassword);
       }
}
The service is calling the checkLogin(...) method on the loginDAO class.
Step 5: Modifying the Login Controller class (LoginController.java)
In the LoginController.java class we have to modify the validation logic to use the service class for validating the user. Here is the complete code of the LoginController.java class.
package net.roseindia.controllers;
/*
@Author: Deepak Kumar
Check more tutorials at http://www.roseindia.net
*/
import org.springframework.stereotype.Controller;
import org.springframework.web.bind.annotation.RequestMapping;
import org.springframework.web.bind.annotation.RequestMethod;
import org.springframework.validation.BindingResult;
import org.springframework.validation.ObjectError;

import org.springframework.beans.factory.annotation.Autowired;


import java.util.Map;
import javax.validation.Valid;

import net.roseindia.form.LoginForm;
import net.roseindia.service.*;


@Controller
@RequestMapping("loginform.html")
public class LoginController {


	@Autowired
	public LoginService loginService;

	@RequestMapping(method = RequestMethod.GET)
	public String showForm(Map model) {
		LoginForm loginForm = new LoginForm();
		model.put("loginForm", loginForm);
		return "loginform";
	}

	@RequestMapping(method = RequestMethod.POST)
	public String processForm(@Valid LoginForm loginForm, BindingResult result,
			Map model) {


		if (result.hasErrors()) {
			return "loginform";
		}

		/*
		String userName = "UserName";
		String password = "password";
		loginForm = (LoginForm) model.get("loginForm");
		if (!loginForm.getUserName().equals(userName)
				|| !loginForm.getPassword().equals(password)) {
			return "loginform";
		}
		*/
		boolean userExists = loginService.checkLogin(loginForm.getUserName(),
                loginForm.getPassword());
		if(userExists){
			model.put("loginForm", loginForm);
			return "loginsuccess";
		}else{
			result.rejectValue("userName","invaliduser");
			return "loginform";
		}

	}

}
Step 6: Add the message in the message resource file 0
Since we are generating the custom error message from the controller class using the following code:
result.rejectValue("userName","invaliduser");
We have to add the message for the property "invaliduser" in the messages.properties file. Here is the complete code of the messages.properties file: 1
NotEmpty.validationForm.userName=User Name must not be blank.
Size.validationForm.userName=User Name must between 1 to 20 characters.
NotEmpty.loginForm.userName=must not be blank.
Size.loginForm.userName=size must between 1 to 50 characters.
NotEmpty.loginForm.password=must not be blank.
Size.loginForm.password=size must between 1 to 20 characters.
NotEmpty.registration.password=Password must not be blank.
Size.registration.password=Password must between 4 to 20 characters.
invaliduser=Invalid Username or Password!! Please try again!!!
Step 7: Modify the pom.xml file to add the necessary dependencies
We have to add the Hibernate and MySQL driver dependencies. Here is the complete code of the pom.xml file:
<project xmlns="http://maven.apache.org/POM/4.0.0" xmlns:xsi="http://www.w3.org/2001/XMLSchema-instance"
  xsi:schemaLocation="http://maven.apache.org/POM/4.0.0 http://maven.apache.org/maven-v4_0_0.xsd">
  <modelVersion>4.0.0</modelVersion>
  <groupId>net.roseindia</groupId>
  <artifactId>springmvclogin</artifactId>
  <packaging>war</packaging>
  <version>1.0-SNAPSHOT</version>
  <name>springmvclogin Maven Webapp</name>
  <url>http://maven.apache.org</url>

  	<properties>
		<spring.version>4.0.3.RELEASE</spring.version>
		<hibernate.core>4.2.7.Final</hibernate.core>
	</properties>

  <dependencies>
    <dependency>
      <groupId>junit</groupId>
      <artifactId>junit</artifactId>
      <version>3.8.1</version>
      <scope>test</scope>
    </dependency>
		<!-- Spring dependencies -->
		<dependency>
			<groupId>org.springframework</groupId>
			<artifactId>spring-core</artifactId>
			<version>${spring.version}</version>
		</dependency>

		<dependency>
			<groupId>org.springframework</groupId>
			<artifactId>spring-web</artifactId>
			<version>${spring.version}</version>
		</dependency>

		<dependency>
			<groupId>org.springframework</groupId>
			<artifactId>spring-webmvc</artifactId>
			<version>${spring.version}</version>
		</dependency>

		<dependency>
			<groupId>org.springframework</groupId>
			<artifactId>spring-web</artifactId>
			<version>${spring.version}</version>
		</dependency>


		 <dependency>
			   <groupId>org.springframework</groupId>
			   <artifactId>spring-orm</artifactId>
			   <version>${spring.version}</version>
		 </dependency>
		 <dependency>
			   <groupId>org.springframework</groupId>
			   <artifactId>spring-jms</artifactId>
			   <version>${spring.version}</version>
		 </dependency>


		<dependency>
			<groupId>javax.validation</groupId>
			<artifactId>validation-api</artifactId>
			<version>1.0.0.GA</version>
		</dependency>

		<dependency>
			<groupId>org.hibernate</groupId>
			<artifactId>hibernate-validator</artifactId>
			<version>4.0.2.GA</version>
		</dependency>

		<dependency>
			<groupId>javax.servlet</groupId>
			<artifactId>javax.servlet-api</artifactId>
			<version>3.1.0</version>
		</dependency>


		<dependency>
			<groupId>org.slf4j</groupId>
			<artifactId>slf4j-log4j12</artifactId>
			<version>1.5.6</version>
		</dependency>

		<dependency>
		   <groupId>commons-fileupload</groupId>
		   <artifactId>commons-fileupload</artifactId>
		   <version>1.3</version>
		</dependency>

		<dependency>
				<groupId>org.hibernate</groupId>
				<artifactId>hibernate-core</artifactId>
				<version>${hibernate.core}</version>
		</dependency>


		<dependency>
			<groupId>mysql</groupId>
			<artifactId>mysql-connector-java</artifactId>
			<version>5.1.30</version>
		</dependency>


  </dependencies>
  <build>
    <finalName>springmvclogin</finalName>

	 <plugins>
		  <plugin>
			<groupId>org.mortbay.jetty</groupId>
			<artifactId>maven-jetty-plugin</artifactId>
			<version>6.1.10</version>
			<configuration>
			  <scanIntervalSeconds>10</scanIntervalSeconds>
			  <connectors>
				<connector implementation="org.mortbay.jetty.nio.SelectChannelConnector">
				  <port>8080</port>
				  <maxIdleTime>60000</maxIdleTime>
				</connector>
			  </connectors>
			</configuration>
		  </plugin>
	</plugins>
  </build>
</project>
Step 8: Add applicationContext.xml file for initializing the Spring and Hibernate related stuffs 2
In the following code you can see the bean definition for mysql "dataSource" and the "sessionFactory", these will be used in the DAO classes.
<?xml version="1.0" encoding="UTF-8"?>
<beans xmlns="http://www.springframework.org/schema/beans"
      xmlns:context="http://www.springframework.org/schema/context"
      xmlns:xsi="http://www.w3.org/2001/XMLSchema-instance"
      xsi:schemaLocation="
        http://www.springframework.org/schema/beans
        http://www.springframework.org/schema/beans/spring-beans-4.0.xsd
        http://www.springframework.org/schema/context
        http://www.springframework.org/schema/context/spring-context-4.0.xsd">

    <!-- Base package for checking the annoted classes -->
      <context:component-scan base-package="net.roseindia"></context:component-scan>

      <!-- Configure JDBC Connection-->
      <bean id="dataSource"
            class="org.springframework.jdbc.datasource.DriverManagerDataSource">
            <property name="driverClassName" value="com.mysql.jdbc.Driver" />
            <property name="url" value="jdbc:mysql://localhost:3306/sprinexamples" />
            <property name="username" value="root" />
            <property name="password" value="root" />
      </bean>

      <!-- Configure Hibernate 4 Session Facotry -->
      <bean id="sessionFactory"
            class="org.springframework.orm.hibernate4.LocalSessionFactoryBean">

			<property name="dataSource">
			  <ref bean="dataSource" />
			</property>

			<property name="hibernateProperties">
			  <props>
					<prop key="hibernate.dialect">org.hibernate.dialect.MySQLDialect</prop>
					<prop key="hibernate.show_sql">true</prop>
			  </props>
			</property>
			<property name="annotatedClasses">
			<list>
				  <value>net.roseindia.model.Users</value> <!-- Entity classes-->
			</list>
			</property>

      </bean>
</beans>
The tag <property name="annotatedClasses"> tells the spring to load the Entity classes.
The tag <context:component-scan base-package="net.roseindia"></context:component-scan> is used to scan for the annotated classes. 3
Step 9: Configure the spring context in the web.xml file
Here is the complete code of web.xml file which is used to configure the spring context:
<?xml version="1.0" encoding="UTF-8"?>
<web-app version="2.5" xmlns="http://java.sun.com/xml/ns/j2ee"
	xmlns:xsi="http://www.w3.org/2001/XMLSchema-instance"
	xsi:schemaLocation="http://java.sun.com/xml/ns/j2ee http://java.sun.com/xml/ns/j2ee/web-app_2_5.xsd">

	<display-name>Spring4Example</display-name>
	<servlet>
		<servlet-name>dispatcher</servlet-name>
		<servlet-class>org.springframework.web.servlet.DispatcherServlet</servlet-class>
		<load-on-startup>1</load-on-startup>
	</servlet>
	<servlet-mapping>
		<servlet-name>dispatcher</servlet-name>
		<url-pattern>/forms/*</url-pattern>
	</servlet-mapping>
	<welcome-file-list>
		<welcome-file>index.jsp</welcome-file>
	</welcome-file-list>


	<context-param>
        <param-name>contextConfigLocation</param-name>
        <param-value>classpath:applicationContext.xml</param-value>
    </context-param>

    <listener>
        <listener-class>
            org.springframework.web.context.ContextLoaderListener
        </listener-class>
    </listener>


</web-app>
Step 10: Running the example 4
To run the example you have to create the war file using following command:
mvn package
After war file is created you can copy it to your Tomcat server and run there. 5
You can also run it through the command prompt using following command:
mvn jetty:run
Above command will run the application on the embedded jetty server. Type the http://localhost:8080/springmvclogin/forms/loginform.html in the browser. If you enter the invalid login it will give following error: 6

So, in this section you have learned how to make Spring 4 MVC login form example and validate against database. Hibernate is used to access the MySQL database server.
Click: Download the Source of the Tutorial in the Eclipse Project format. 7