Authentication in Web Application
![]()
![]()
![]()
Example for Authenticating user in JSP based application using servlet and MySql
In this example we will show you how to authenticated the user against database user name and password. This program constists of a JSP page and a Servlet to authenticate the user against database password.
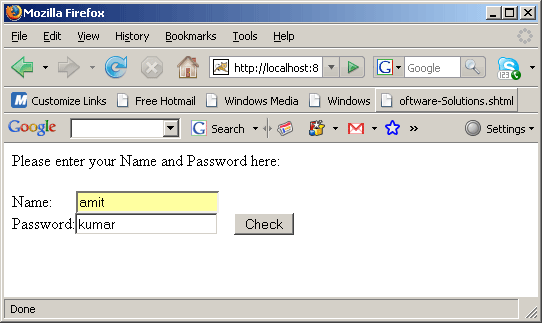
User enters the username and password on the JSP page and clicks on the the "Check" button. On the form submit event data is posted to the Servlet for authenticating the user. Servlet makes JDBC connection and authenticate the user.
We are using tomcat server for running Servlet and JSP page. You can use any browser to test the application
Authentication means that user can be recognized that the user really exist for which he is inputting values. We are using two files Authentication.jsp and Authentication.java and we are making the application in "webapps/JSPMultipleForms" in tomcat server. We have used MySQL for database connection and by putting values in "user" table we have authenticated the input of user. Table structure code for "user" table is given as below:
User Table Structure of MySQL:
| CREATE TABLE `user` ( `user` varchar(256) default NULL, `password` varchar(256) default NULL ) ENGINE=InnoDB DEFAULT CHARSET=latin1; /*Data for the table `user` */ insert into `user`(`user`,`password`) values ('amit','kumar'); |
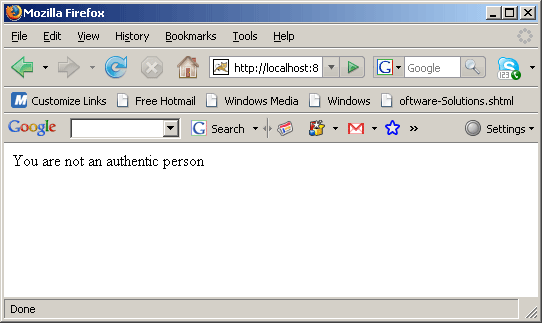
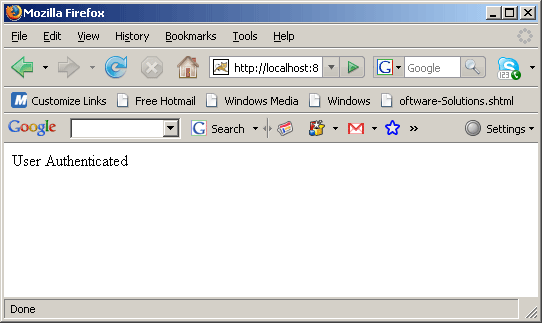
Authentication.jsp is calling Servlet to authenticate user's input. Servlet "Authentication.java" which will first establishes the JDBC connection to the database on the machine whose IP address is 192.168.10.59. The database used in this application is messagepaging. You can change the database before running the example at your machine. Then program authenticates the user against database. If input given by user is correct then a message will flash on the browser that "User Authenticated" else "You are not an authentic person".
The code for Authentication.java is given below:
1. Authentication.java
import java.io.*;
import java.util.*;
import java.sql.*;
import javax.servlet.*;
import javax.servlet.http.*;
public class Authentication extends HttpServlet{
  private ServletConfig config;
  public void init(ServletConfig config)
  throws ServletException{
 this.config=config;
 }
  public void doPost(HttpServletRequest request, HttpServletResponse response)
throws ServletException,IOException{
  PrintWriter out = response.getWriter();
  String connectionURL = "jdbc:mysql://192.168.10.59/messagepaging";
  Connection connection=null;
  ResultSet rs;
  String userName=new String("");
  String passwrd=new String("");
  response.setContentType("text/html");
  try {
 // Load the database driver
  Class.forName("com.mysql.jdbc.Driver");
  // Get a Connection to the database
  connection = DriverManager.getConnection(connectionURL, "root", "root");
  //Add the data into the database
  String sql = "select user,password from User";
  Statement s = connection.createStatement();
  s.executeQuery (sql);
  rs = s.getResultSet();
  while (rs.next ()){
  userName=rs.getString("user");
  passwrd=rs.getString("password");
  }
  rs.close ();
  s.close ();
  }catch(Exception e){
  System.out.println("Exception is ;"+e);
  }
  if(userName.equals(request.getParameter("user")) &&
  passwrd.equals(request.getParameter("pass"))){
  out.println("User Authenticated");
  }
  else{
  out.println("You are not an authentic person");
  }
  }
}
2. Authentication.jsp
<%@ page language="java" %>
Please enter your Name and Password here:
<br>
<br>
<form name="frm" action="/JSPMultipleForms/Authentication" method="Post" >
Name: <input type="text" name="user" value=""/>
Password:<input type="text" name="pass" value=""/>
<input type="submit" value="Check" />
</form>
For invoking servlet in tomcat server we have to include the following lines into "web.xml" file.
3. web.xml
| <!--web.xml code -->
<servlet> |
To Run the above example you have to follow these steps:
1.Create and Save Authentication.java.
2.Compile Authentication.java and place the class file into classes folder.
3.Insert the servlet name and mapping in web.xml.
4.Create and Save Authentication.jsp file in JSPMultipleForms folder.
5.Deploy the Tomcat Server.
6.Type the following line in address bar "http://localhost:8080/JSPMultipleForms/Authentication.jsp"
Output :
Authentiocation.jsp
User authenticated
User not authenticated