
Building a Simple EJB Application - A Tutorial


By Jeevaraj Gnanaselvan Dhanaraj ([email protected]) (Jeeva has over 7 years of experience in designing and developing enterprise class web applications using JAVA and J2EE technologies. He currently works for Itreya Technologies, Bangalore, leading a team of over 10 programmers and designers, developing a multi-user, distributed, web-based workflow application)
Introduction
In
this tutorial we will create a simple session EJB and a client web application
using eclipse IDE along with Lomboz
plug in
and
XDoclet.
This application, while
simple, provides a good introduction to EJB development and some of the Web
development tools available.
Environment
J2SDK
1.4.2
http://java.sun.com/
Eclipse
3.1
JBoss
4.0.2
XDoclet
1.2.3
http://xdoclet.sourceforge.net
Lomboz
3.1RC2
http://lomboz.objectweb.org/
Installation
Install
JDK (in D:\j2sdk1.4.2_04)
Install
JBoss (in E:\jboss-4.0.2)
Install
Xdoclet (in D:\xdoclet\xdoclet-1.2.3)
Install
Eclipse (in E:\Eclipse3.1)
Install
Lomboz (in E:\Eclipse3.1)
Setting up
Set
up the installed JRE in eclipse (Windows -> Preferences -> Java ->
Installed JREs)

Set up the installed runtime for server in eclipse (Windows -> Preferences -> Server -> Installed Runtimes)


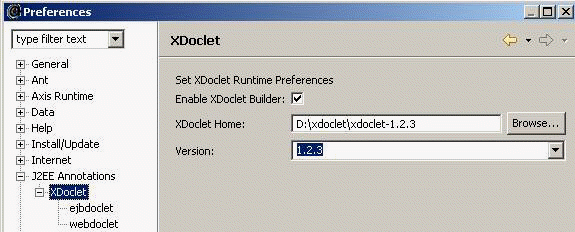
Set up Xdoclet in eclipse (Windows -> Preferences -> J2EE Annotations -> XDoclet)
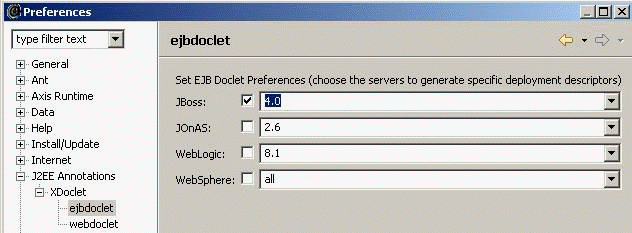
Set up the ejbdoclet for JBoss in eclipse (Windows -> Preferences -> J2EE Annotations -> Xdoclet -> ejbdoclet)
Creating a Session Bean 0
Open the J2EE perspective in eclipse (Windows -> Open Perspective -> Other -> J2EE)

 1
1
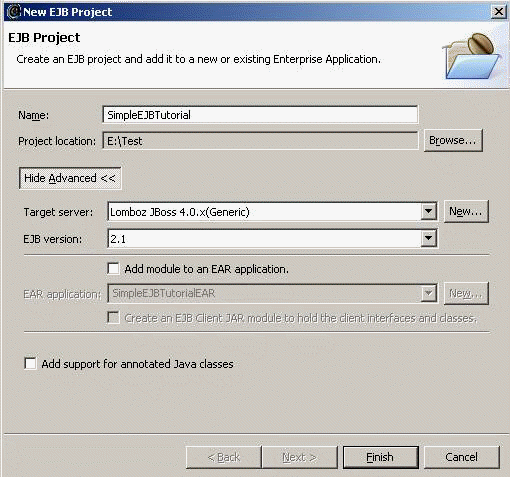
Create a new EJB Project from the Project Explorer (EJB Projects -> New -> EJB Project)

Enter name as "SimpleEJBTutorial" and select project location as "E:\Test". 2

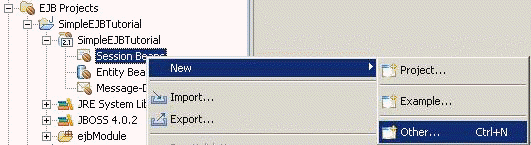
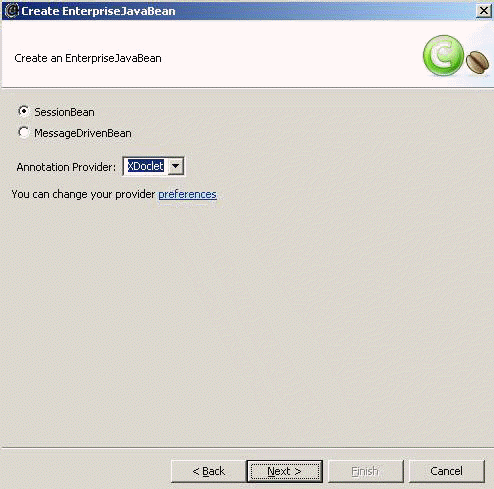
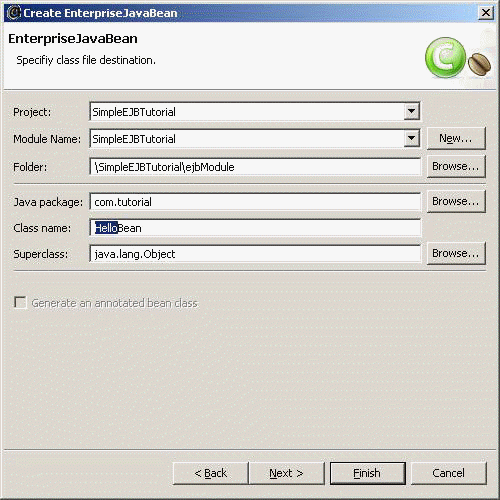
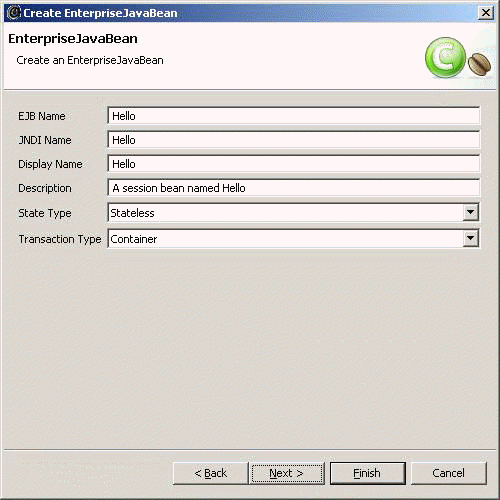
Now create a new Session Bean from the Project Explorer (EJB Projects -> Simple EJB Tutorial -> ejbmodule -> New -> Other) 3

 4
4
 5
5

Note:
XDoclet is an extended Javadoc Doclet engine. It's a generic Java template
engine that lets us create custom Javadoc @tags and based on those @tags
generate source code or other files (such as deployment descriptors in xml
form). XDoclet supports a set of common standard tasks such as web.xml or
ejb-jar.xml generation. It uses special JavaDoc @tags to define settings for
each component. For example, putting a @ejb.bean name="Hello" jndi-name="Hello"
type="Stateless" in HelloBean.java
We have to edit only the HelloBean.java. All others are automatically generated
and XDoclet will regenerate them each time we make a change to the HelloBean
class. 6
Edit the HelloBean class and change the foo method to
public String sayHello(String param) {
return "Hello..";
}
The XDoclet builder will start working again and update our classes. At the end our projects will look like: 7
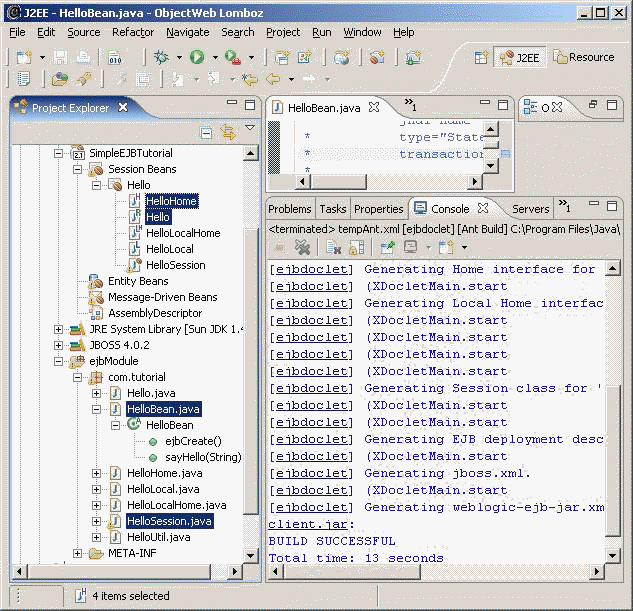
The highlighted classes HelloBean.java and HelloSession.java are server side classes and Hello.java and HelloHome.java are public interfaces. These are the classes that will be needed by all clients.
Deploying the Session Bean 8
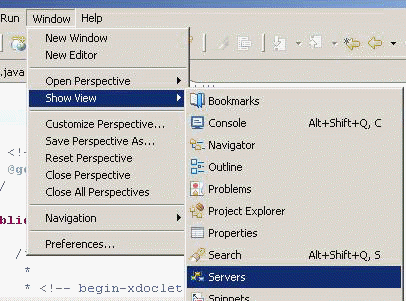
Open the Servers view (Windows -> Show View -> Servers)
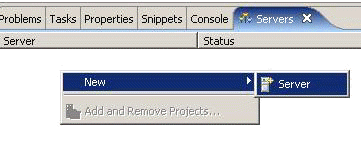
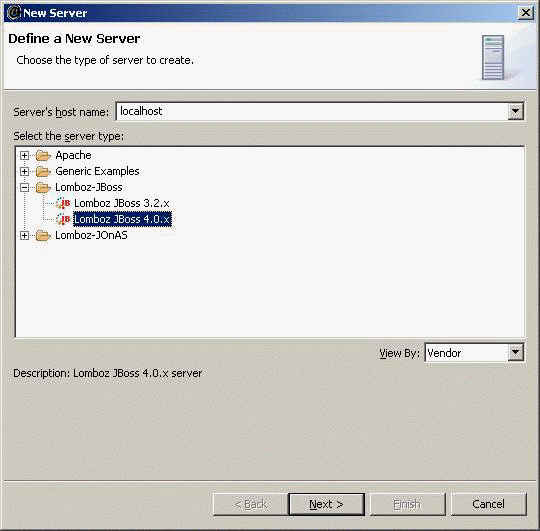
Create a new server by right-clicking inside the "Servers" view. 9
 0
0
Choose SimpleEJBTutorial from the available projects.
Ensure that the option "Automatically publish when starting server" is checked.
 1
1

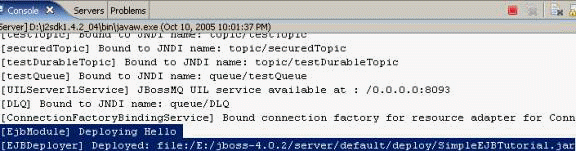
Look for console messages such as:
22:02:13,274 INFO [EjbModule] Deploying Hello
22:02:13,556 INFO [EJBDeployer] Deployed:
file:/E:/jboss-4.0.2/server/default/deploy/SimpleEJBTutorial.jar 2
Now the EJB has been defined and deployed. It is ready to be used. We can now build a client to make the HelloBean say Hello.
Creating a Web client Application 3
Create a new Dynamic Web Project namely ?HelloWeb? from the Project Explorer (Dynamic Web Projects -> New -> Dynamic Web Project)

 4
4
We will need to access the EJB interface types such as Hello and HelloHome in client applications.
These classes are required to be added in the build path.
In the Project Explorer, right click on the HelloWeb dynamic web project and Choose Properties... 5

In the Java buildpath, add the SimpleEJBTutorial project to the project references. This will help allows us to compile against the latest ejb client classes in this web project.
 6
6
Create a new "test.jsp" under the HelloWeb\WebContent� directory.

 7
7

Open test.jsp in the JSP source page editor.
Add the following lines in the "body" of test.jsp 8
<%
com.tutorial.Hello hello = null;
try{
com.tutorial.HelloHome home = com.tutorial.HelloUtil.getHome();
hello = home.create();
}catch(Exception exception)
{
}
%>
<b><%= hello.sayHello(" my friend !") %></b>
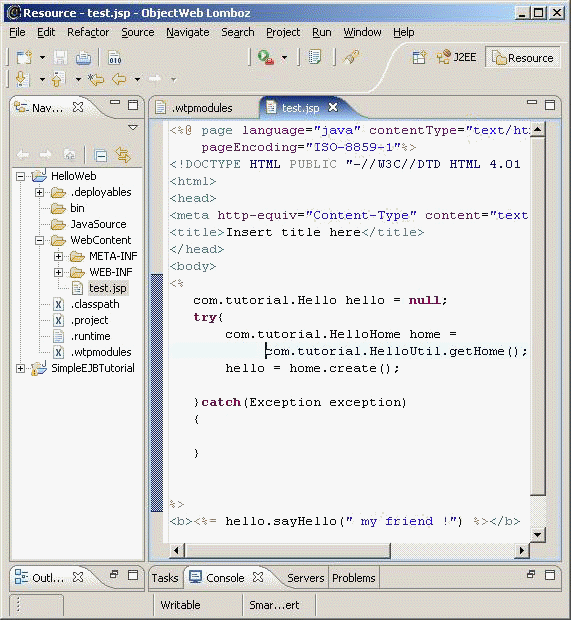
Save the test.jsp. Our web application is now complete. 9
Deploying and running the Web client Application
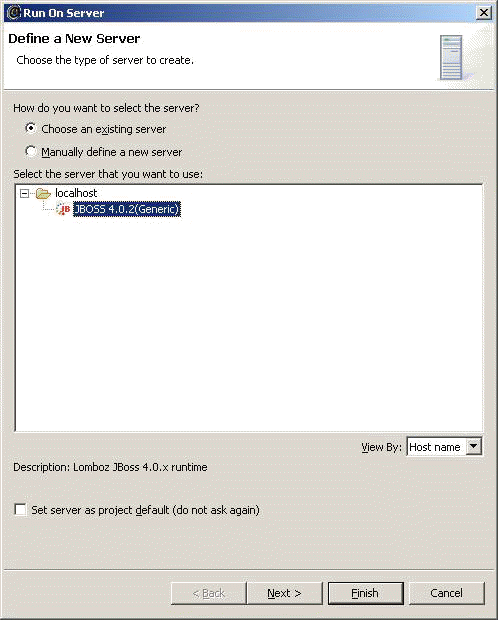
Right click on test.jsp and select Run As -> Run on Server...
 0
0
Look for something like: [TomcatDeployer] deploy, ctxPath=/HelloWeb, warUrl=file:/E:/jboss-4.0.2/server/default/tmp/deploy/tmp52097HelloWeb-exp.war/ on the console.

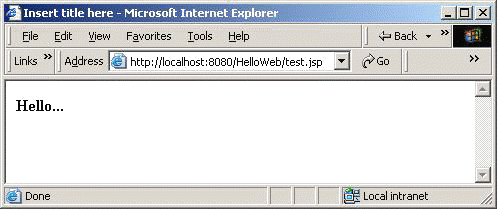
Same application can be invoked from browser using the url, http://localhost:8080/HelloWeb/test.jsp 1
Experiment adding more methods and ejbs.
Conclusion 2
In this tutorial we learned how to configure Eclipse to work with XDoclet and create a J2EE EJB project that has a Session Bean. We created a client Web application. This application, while simple, provides a good introduction to EJB development and some of the Web development tools available.