Introduction to Docker Images - Understanding Docker image and creating own image
In this article we are going to introduce you with Docker image and teach you to create own Docker image, which simply displays Hello World message on the console and then exits. Learning required lots of practice and this lesson is next steps towards learning Docker. First of all we will understand Docker image, its architecture and then learn to create our own Docker image based on Ubuntu 18.04 base image.
As explained in previous examples, Docker Hub hosts many pre-build Docker images which can be used. In the last section we have used the nginx image from Docker Hub. In this section we will use the Ubuntu 18.10 image and spin our own custom Docker image. So, let's get started.
Let's get started with the Docker Images.
What is Docker Image?
The Docker Image is the fundamental unit of a running container. It is a collection of applications, configuration files and any other files that are required to complete the job of running the container. The image is comprised from several layers; the base layer (the first image), the base-compiler layer (the first layer that is used to run Docker Compose) and the image layers, which are used to manage the layer's configuration. These components can be added, removed, or enabled/disabled. In short, an image contains a collection of images that can be deployed together.
Why Use Docker?
Before deploying a new image to a production server, you need to make sure the new image contains the required features, features that are typically not bundled or provided along with the core operating system. For example, if you have a new operating system installed (Ubuntu, CentOS, etc.) when you deploy an image, the new system might not include the required updates (such as Apache, MySQL or PHP). This means that new applications might start up with an incorrect configuration, or the new application might not work properly.
You will also need an image that can run the application that you've deployed. When deploying an image that contains the application, the Docker daemon listens to requests from the application container and returns the needed configuration data and restarted the application, providing the latest and most updated Docker configuration. With Docker, the application container gets all the benefits of containerization, while the entire application container, including all its components, is maintained and managed by the Docker daemon.
The Docker container image is an image, which means that unlike a virtual machine or image on a virtual disk, once you create a Docker image and deploy it on a machine, the image stays where you put it until you remove it or it is updated.
You can also deploy different image types that depend on different operating systems. For example, if you have application servers that run on Ubuntu LTS or Ubuntu Server, you can deploy an image that runs on Ubuntu LTS or Ubuntu Server.
What is Dockerfile?
Docker provides a special text file which is usually saved with the name "Dockerfile"
and used for the creation of Docker image. Dockerfile is a simple text file
where the user adds the instructions/command to prepare the Docker Image. For
example you can take the base image of Ubuntu 18.04 from Docker Hub and then add
libraries necessary to run your program. If you are going to run a Java program
then you can add the JDK and other necessary libraries into the image. Then use
this image to run your Java program. Similarly for Node.js based applications
you can add instruction in Dockerfile to download and add Node libraries in the
image. Once you complete the instruction in the Dockerfile, you can use the
docker build command to build your Docker image for running your applications.
In this example we are going to create a simple Docker image that sleeps for 30
seconds then prints a message and exits.
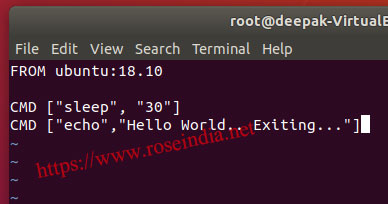
Create a file "Dockerfile" and add following code to it:
FROM ubuntu:18.10

CMD ["sleep", "30"]
CMD ["echo","Hello World.. Exiting..."]
In the above file we are instructing Docker to download the base Ubuntu 18.10 image and then add the following two instructions:
CMD ["sleep", "30"] - Sleeping for 30 seconds
CMD ["echo","Hello World.. Exiting..."] -- printing the message before exit
So, if we run our image then it will wait for 30 seconds, print the message and exit.
Docker containers run only till there is some process running inside the container. Our container sleeps for 30 seconds and then prints the message. After printing the message there is no process and Docker exits.
Building the Docker image
To build the Docker image run the following command:
docker build -t my_ubuntu .
Above command will download the required image from Docker Hub to build the custom Docker image.
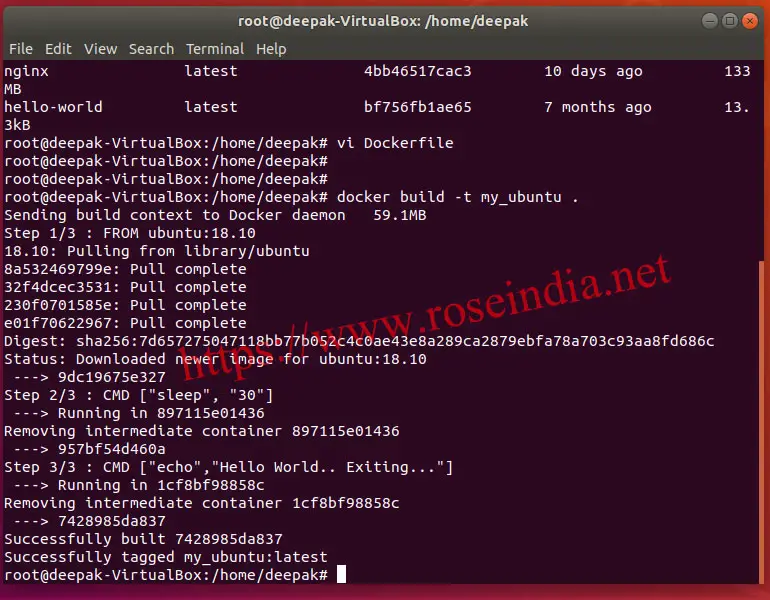
Here is the output of the command:
root@deepak-VirtualBox:/home/deepak# docker build -t my_ubuntu .
Sending build context to Docker daemon   59.1MB
Step 1/3 : FROM ubuntu:18.10
18.10: Pulling from library/ubuntu
8a532469799e: Pull complete
32f4dcec3531: Pull complete
230f0701585e: Pull complete
e01f70622967: Pull complete
Digest: sha256:7d657275047118bb77b052c4c0ae43e8a289ca2879ebfa78a703c93aa8fd686c
Status: Downloaded newer image for ubuntu:18.10
 ---> 9dc19675e327
Step 2/3 : CMD ["sleep", "30"]
 ---> Running in 897115e01436
Removing intermediate container 897115e01436
 ---> 957bf54d460a
Step 3/3 : CMD ["echo","Hello World.. Exiting..."]
 ---> Running in 1cf8bf98858c
Removing intermediate container 1cf8bf98858c
 ---> 7428985da837
Successfully built 7428985da837
Successfully tagged my_ubuntu:latest
root@deepak-VirtualBox:/home/deepak#
Here is the output of the process:
SCREEN SHOT
Running the Docker image in container
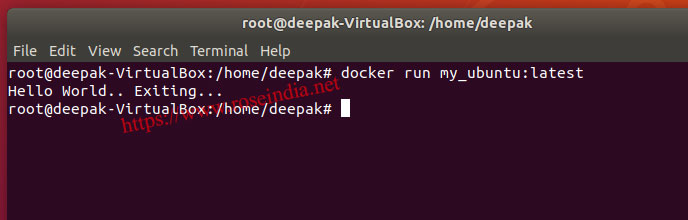
Now we can run the newly created image with following command:
docker run my_ubuntu:latest
Here is the output of the above command which runs our newly created image "my_ubuntu:latest":
If you type docker ps -l then it will show the details of the container which exited a few seconds back.
In this section we learned to create our own Docker image and then run it in Docker container. In the next section we will learn important Docker commands that you should know to work with Docker.
Here are more tutorials of Docker:
