Ext Js form example.


In this simplified application and easy to learn Ext Js Tutorial I will show
you how to develop a form in Ext Js framework. The Ext Js form will take the input from user
(in "register.html" file). The framework will validate
the input and finally submit the form data to a servlet "register.java".
Then Servlet retrieves all the data and saves into database using JDBC
connection. This example will help you to get standard with Ext Js framework
in shortest possible time.
Ext JS provides UI elements for developing web based RIA applications. It provides many ready to use controls such as Grid, Tab Panel, Window, Tree, Layout, ComboxToolBars etc.
Steps to develop the Ext Js form example:
Step 1: Download and install the ext framework and create web application
Download latest version of Ext Js from the official site of Ext Js http://extjs.com/products/extjs/download.php.
For this tutorial we have downloaded ext-2.1.zip from the site.
Procedure to create the directory structure for making the form Ext Js application. Here we have developed an application "register" on Tomcat server. Create a directory "register" in the webapps directory of tomcat server.
Then follow the following steps:
1.Create lib directory under register directory and copy these files
a) ext-2.1/adapter/ext/ext-base.js
b)ext-2.1/ext-all.js into lib directory.
2.Create images directory under register directory and copy these images
a)ext-2.1/resources/images/default/button/btn-sprite.gif
b)ext-2.1/resources/images/default/panel into images
directory.
3.Create css directory under register directory and copy these style
a)ext-2.1/resources/css/ext-all.css into css
directory.
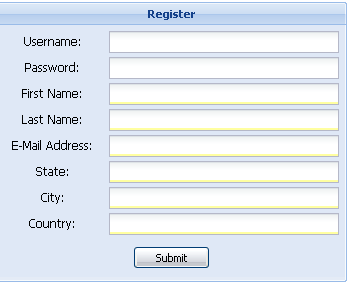
Step 2: Create form
Now we will develop the form for our application. Create html file in the register directory and add the following code into it (register.html)
<html>
   <head>
     <meta http-equiv="Content-Type" content="text/html; charset=iso-8859-1">
	<title>Register</title>
	<link rel="stylesheet" type="text/css" href="css/ext-all.css"/>
      <script type="text/javascript" src="lib/ext-base.js"></script>
	  <script type="text/javascript" src="lib/ext-all.js"></script>
	  <script type="text/javascript" src="lib/register.js"></script>
	</head>
	<body>
	   <table width="100%" align="center">
	      <tr>
		  <td width="100%" align="center" style="padding-top:100px;">
	            <div id="mydiv"></div>
	          </td>
	      </tr>
	   </table>
	</body>
</html>
|
Program explanation:
Now we will see how to include the Ext js framework into our application. You can easily include Ext JS framework in your application using the following code snippets:
| <script type="text/javascript"
src="lib/ext-base.js"></script> <script type="text/javascript" src="lib/ext-all.js"></script> |
and then add the following code also:
<script type="text/javascript" src="lib/register.js"></script>
Which actually used to create the html form using Ext Framework.
The "register.js" is include to make form
having id "mydiv".
Step 3:
To retrieve the form data and insert into the database create a new Servlet. We will use register.java as our servlet which fetches the user input and insert into database.
import java.io.*;
|
Save the above file into "register\WEB-INF\classes" directory.
Step 4:
Add following servlet entry into web.xml file:
| <?xml version="1.0" encoding="ISO-8859-1"?> <web-app xmlns="http://java.sun.com/xml/ns/javaee" xmlns:xsi="http://www.w3.org/2001/XMLSchema-instance" xsi:schemaLocation="http://java.sun.com/xml/ns/javaee http://java.sun.com/xml/ns/javaee/web-app_2_5.xsd" version="2.5"> <display-name>Welcome to Tomcat</display-name> <description> Welcome to Tomcat </description> <servlet> <servlet-name>register</servlet-name> <servlet-class>register</servlet-class> </servlet> <servlet-mapping> <servlet-name>register</servlet-name> <url-pattern>/register</url-pattern> </servlet-mapping> </web-app> |
Step 5:
Now compile the java code using javac command from command prompt.
Step 6:
Create a database called user_register and then create register� table. Here is the sql query to create register table:
| create table `register` ( `id` double , `username` varchar (100), `password` varchar (100), `firstname` varchar (100), `lastname` varchar (100), `email` varchar (100), `state` varchar (100), `city` varchar (100), `country` varchar (100) ); |
Step 7:
Start tomcat and then type http://localhost:8080/register/register.html in the browser and press enter. Enter the values and press "Submit" button. You browser should display the success message. If data is inserted successfully then it display success message otherwise it can be send redirect to register.html.
Successful Output of the program:
![]() 0
0
Download the full web application discussed here.
1