MySQL 8 Tutorial - Getting Started with MySQL 8.0 relational database
MySQL 8 is very powerful open source relational database management system and it is one of the most used database in the enterprise. The version 8 of MySQL server comes with the many new features and updates to make it the ideal database to run today's business workload. In this Getting Started with MySQL 8.0 video tutorial I am going to teach you this database server from the beginning. You will learn to install MySQL 8.0 Server on your windows computer and then learn to work with this database. You will learn to connect to the database server through MySQL client and perform various database operations.
We have also provided you the video instruction of this tutorial so that you can easily begin with the MySQL 8.0 database server. In the video you will find the instruction of downloading, installing and using the MySQL 8.0 database server. If you have not worked with the MySQL server previously then you can easily get started with the MySQL 8.0 server and learn the basics easily.
Pre-requisite for Getting Started with MySQL 8.0 tutorial
- Prior understanding of Relational databases
- Some experience with any of the relational databases
- Aware of the database concepts
- Experience in programming using any of the programming language
After completing Getting Started with MySQL 8.0 tutorial you will be able to work with latest MySQL 8.0 server and use it for storing business database.

Let's get started with the MySQL 8.0 server.
Topics covered in the Getting Started with MySQL 8.0 tutorial
- Understanding MySQL Server
- Downloading and installing MySQL server 8.0 latest version
- Using MySQL Command Line Client
- Creating Database
- Connecting to Database
- Create Table
- Insert Data into Table
- List all Data from table
- Update Data
- Delete Data
- Delete Table
- Create and Modify Table structure
- Working with SQL
- Database Backup and restore
1. Understanding MySQL Server
Database servers are used to handle large amount of data for the businesses. The relational databases (RDBMS) are very important for managing a large collection of datasets in enterprises. MySQL server is also one of the most used database servers in the open-source world. Large number of websites and web applications are using MySQL as back-end for running these websites.
MySQL 8.0 is a powerful RDBMS server that comes with many new features and it also supports the JSON document. This database is powerful enough to run today's demanding business applications.
MySQL comes with many features such as:
- Transactional Data dictionary
- Atomic data definition statements (Atomic DDL).
- Upgrade procedure
- Security and account management
- Resource management
- InnoDB enhancements
- Enhanced JSON support
- Persistent runtime configuration
- Document Store
2. Downloading and installing MySQL server 8.0 latest version
MySQL 8.0 server is available for Windows, Linux, MacOSX and other major operating system, which can be downloaded from the official MySQL website at "https://dev.mysql.com/downloads/installer/".
Here is the screen shot of the website:

In the above website you can find the link to download MySQL 8.0 (at the time of writing this tutorial). You should click on the "Download" link next to the 435.7M and you will get the offline installer of MySQL 8.0. In the offline installer, you will get all the components and this installer is not connected to the mysql download website during the installation.
For installing the MySQL 8.0 server you can double click on the downloaded exe file and follow the instruction to install on your computer. Here is the complete video tutorial "Getting Started with MySQL 8.0" which will teach you MySQL 8.0 server from beginning.
The above video tutorial is one of the best video instruction for learning MySQL 8.0 start from beginning and mastering. You will get the skills to work on the MySQL 8.0 database server and manage your business data.
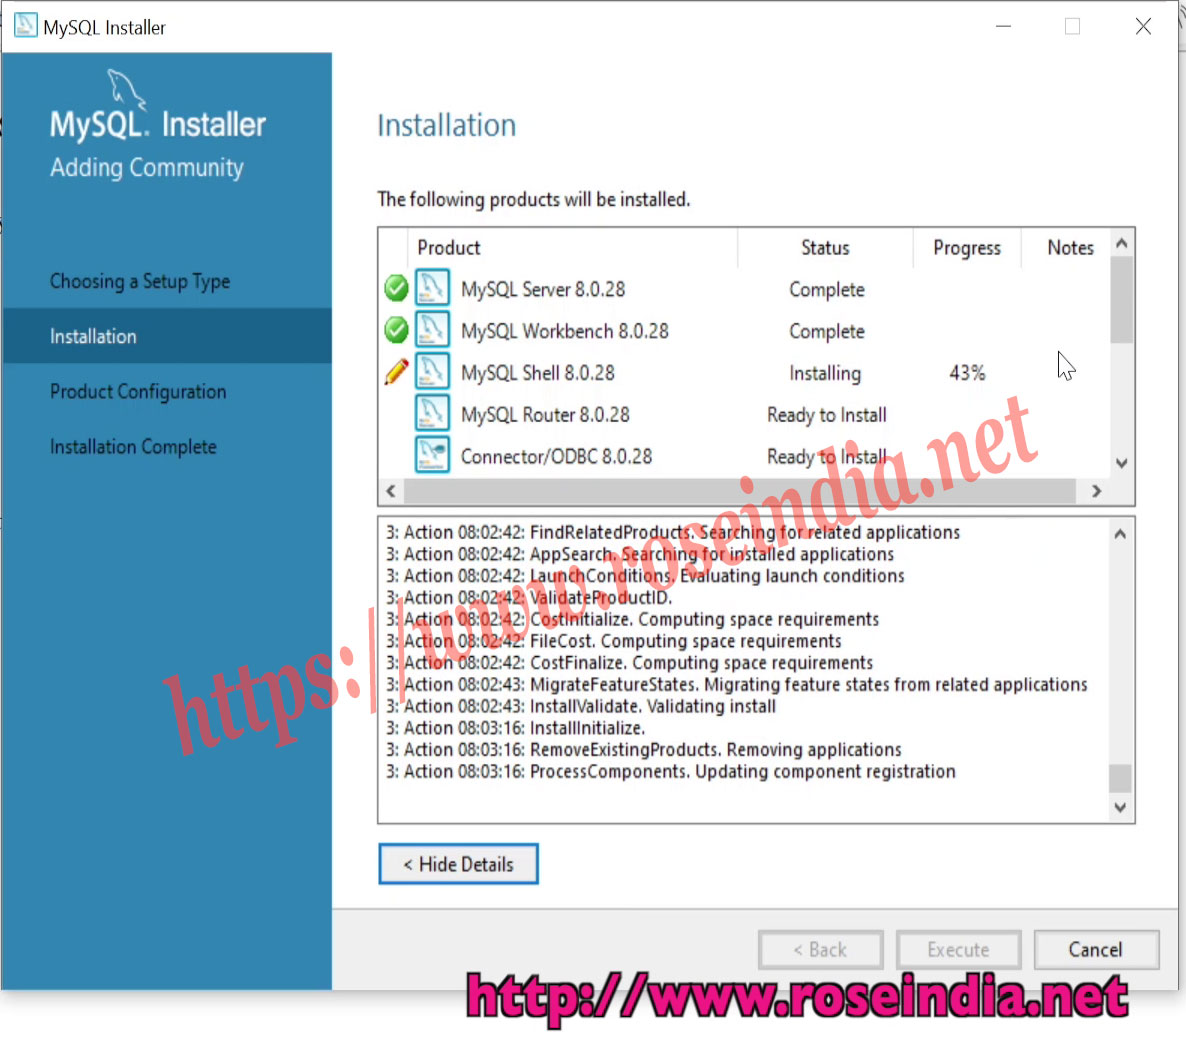
The above screenshot shows the MySQL 8.0 installer and you can see its installing various MySQL 8.0 Server components. The MySQL installer is a wizard based tool that helps in installing MySQL server with ease.
3. Using MySQL Command Line Client
The MySQL command line client is used to connect to the MySQL server instance with the valid username and password. To access the MySQL command line tool search "MySQL 8.0 Command Line Client" in the Windows 10 application search bar and then click on the "MySQL 8.0 Command Line Client" application link. You will find all these steps in the video tutorial given above. Here is the screen shot of "MySQL 8.0 Command Line Client":

4. Creating Database
The create database DATABASE_NAME sql is used to create a database into the MySQL server. Here is the sql query to create a database:
# Create Database
create database sqltutorials;
The above sql query will create a database named sqltutorials into MySQL server.
Here are more sql queries used in the video tutorial:
# Drop Database
drop database sqltutorials;

# Display all available Databases
show databases;

# Create a new database
create database sqltutorials;
5. Connecting to Database
First of all you have to connect to the database to create table or add data to existing table. Following sql command is used to connect to a database:
#connect to the database
connect sqltutorials;
You can use the following sql query to list down all the tables in the database:
#show tables in the database
show tables;
6. Create Table
The CREATE TABLE <TABLE_NAME> sql is used to create a table in the MySQL Database. Here is the example sql for creating a table:
CREATE TABLE email
(
id int(11) NOT NULL AUTO_INCREMENT,
user_name varchar(200),
email_add varchar(400),
PRIMARY KEY (`id`)
);

show tables;

# View the structure of table
describe email;


desc email;
7. Insert Data into Table
The insert into <table> sql is used to insert data into a table. Here is the example query for inserting data into email table:
#Insert a new Record

insert into email(user_name,email_add) values('Ujjawal','ujjawal@roseindia.net');
8. List all Data from table
The select * from <table> query is used to get all the records from the database. Here is the sql query to get all data from email table:
# fetch all data from table
select * from email;
9. Update Data
The update <table> set <field values> sql is used to update the data in a table. Here is the example of updating a record into email table:
# update a record

update email set email_add='ujjawal.k@roseindia.net' where id=1;
Display all the records from table:
select * from email;

# Insert another record
insert into email(user_name,email_add) values('David','david@roseindia.net');
10. Delete Data from table
The delete from <table> query is used to delete the data from table. Here is one example of delete a record from the email table:
# Delete record using where clause
delete from email where id = 1;
11. Delete Table
For deleting a table DROP TABLE <TABLE_NAME> query is used. Following example sql will delete the email table: 0
# Delete table

DROP TABLE email;
The delete table command is irrecoverable and once delete data can't be recovered. So, you should use the delete table query very carefully.
11. Create and Modify Table Structure
You can create a table with following sql:
CREATE TABLE email
(
id int(11) NOT NULL AUTO_INCREMENT,
user_name varchar(200),
email_add varchar(400),
PRIMARY KEY (`id`)
);

show tables;
You can modify the structure of table by alter table <table> sql command. Here is the example sql that adds a new column in the table: 1
alter table email add column full_name varchar(150);
13. Working with SQL
The SQL stands for the Structured Query Language, which is used for performing the various operations against database. Check our SQL Tutorials section to learn SQL in detail.
14. Database backup and restore
There are three ways you can take the backup of your MySQL database table and data. You can choose any of these methods as per your business needs. Here are three ways you can take backup of your MySQL server database:
- Full backup of database and tables
- Backup of table structure only
- Backup of data only
MySQL comes with the mysqldump command line tool which is used by developers and admins to take backup of MySQL Database. 2
Let's learn all these methods one by one and experiment with it.
a) Full backup: How to take full backup of all the tables and data?
Use the following command to accomplish this: 3
mysqldump -u admin -p admin sqltutorials > sqltutorials.sql
or
mysqldump -uadmin -p sqltutorials > sqltutorials.sql
b) Structure Only Backup: Taking the backup of table structures only.
Use the following command to accomplish this: 4
mysqldump -u admin -p admin --no-data sqltutorials > sqltutorials.sql
or
mysqldump -uadmin -p --no-data sqltutorials > sqltutorials.sql
c) Data Only backup: Taking the backup data only.
Use the following command to accomplish this: 5
mysqldump -u admin -p admin --no-create-info sqltutorials > sqltutorials.sql
or
mysqldump -uadmin -p --no-create-info sqltutorials > sqltutorials.sql
Restoring MySQL Database from backup
The mysqldump tool helps in easily restoring the MySQL database from backup file. Here is the example command that restores the data into sqltutorials database from sqltutorials.sql file. 6
mysql -u admin -p admin sqltutorials< sqltutorials.sql
or
mysql -u admin -p sqltutorials< sqltutorials.sql
Open the terminal as Administrator and then go to the mysql bin directory:
cd C:\Program Files\MySQL\MySQL Server 8.0\bin
Now you can use the command described above to take the backup and restore databases. 7
Related MySQL Tutorials