
How to write hello world example program in Hibernate?
Hello World tutorial is first example program for a beginners leaning Hibernate ORM language, it explains the steps of writing code in Hibernate. This Hibernate tutorial is for beginners which teaches you to write code for inserting data in the database table and finally printing the famous "hello world" message on the console.
What you need for this tutorial?
- JDK 7 or above must be installed and configured on your computer
- MySQL database is required for this example and you should first install MySQL database on your computer. Basic working knowledge with MySQL is necessary. You should be able to login to the MySQL database, create database, create tables, insert data into table and query the data.
- Eclipse tool must be installed and configured
- Any flavour of MS Windows operating system. We are using Windows 7 computer but you can use OS of your choice as there is little no change in steps of developing and running the example program.
This tutorial explains to create your first Hibernate program step-by-step. After completing this tutorial you will be able to understand the components of Hibernate based program.
Writing Hibernate hello world program
In this section, you will learn about basic tutorial of inserting value in the database table and printing "hello world" on the console after successful insertion.
Example Program:
In the below example, we are inserting a record and after successful insertion a Hibernate Hello World Example message will be displayed.
Hibernate example code constructs the object of employee entity and then saves the data using Hibernate framework. Following is the source code for saving the data using Hibernate:
session.beginTransaction();
Employee emp=new Employee();
emp.setEmpName("Rajesh Koothrapalli");
session.save(emp);
session.getTransaction().commit();
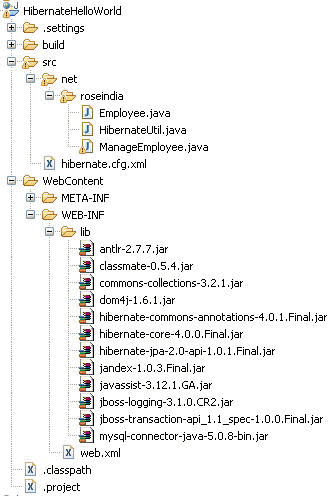
The project structure and jar file used is given below:
The query used to create employee table is given below:
CREATE TABLE `employee` (
`Emp_code` int(11) NOT NULL auto_increment,
`Emp_name` varchar(30) default NULL,
PRIMARY KEY (`Emp_code`)
) ENGINE=InnoDB DEFAULT CHARSET=latin1
First login to MySQL database and then connect to your database. After connecting to MySQL database use the above sql query to create table in MySQL database.
Java Source Code
The annotated Employee entity class is given below :
package net.roseindia;

import javax.persistence.Column;
import javax.persistence.Entity;
import javax.persistence.GeneratedValue;
import javax.persistence.Id;
import javax.persistence.Table;

@Entity
@Table(name = "employee")
public class Employee {
@Id
@GeneratedValue
@Column(name = "Emp_code")
private int EmpCode;

@Column(name = "Emp_name")
private String EmpName;

public int getEmpCode() {
return EmpCode;
}

public void setEmpCode(int empCode) {
EmpCode = empCode;
}

public String getEmpName() {
return EmpName;
}

public void setEmpName(String empName) {
EmpName = empName;
}
}
hibernate.cfg.xml
This file is used to configure the Hibernate like providing the database url, database name, user name and password to connect to MySQL Database. Here is the full source code of hibernate.cfg.xml file:
<?xml version='1.0' encoding='utf-8'?>
<!DOCTYPE hibernate-configuration PUBLIC
"-//Hibernate/Hibernate Configuration DTD//EN"
"http://hibernate.sourceforge.net/hibernate-configuration-3.0.dtd">

<hibernate-configuration>
<session-factory>
<property name="hibernate.connection.driver_class">com.mysql.jdbc.Driver</property>
<property name="hibernate.connection.url">jdbc:mysql://192.168.10.13:3306/ankdb</property>
<property name="hibernate.connection.username">root</property>
<property name="hibernate.connection.password">root</property>
<property name="hibernate.connection.pool_size">10</property>
<property name="show_sql">true</property>
<property name="dialect">org.hibernate.dialect.MySQLDialect</property>
<property name="hibernate.current_session_context_class">thread</property>

<mapping class="net.roseindia.Employee" />

</session-factory>
</hibernate-configuration>
HibernateUtil.java
This class is used to instantiate Hibernate SessionFactory in the program.
Using this class, we have created SessionFactory instance :
package net.roseindia;

import org.hibernate.SessionFactory;
import org.hibernate.cfg.Configuration;
import org.hibernate.service.ServiceRegistry;
import org.hibernate.service.ServiceRegistryBuilder;

public class HibernateUtil {
private static SessionFactory sessionFactory;
private static ServiceRegistry serviceRegistry;
private static SessionFactory buildSessionFactory() {
try {
// Create the SessionFactory from hibernate.cfg.xml
Configuration configuration = new Configuration();
configuration.configure();
serviceRegistry = new ServiceRegistryBuilder().applySettings(configuration.getProperties()).buildServiceRegistry();
return configuration.buildSessionFactory(serviceRegistry);

}
catch (Throwable ex) {
// Make sure you log the exception, as it might be swallowed
System.err.println("Initial SessionFactory creation failed." + ex);
throw new ExceptionInInitializerError(ex);
}
}

public static SessionFactory getSessionFactory() {
sessionFactory=buildSessionFactory();
return sessionFactory;
}

public static void shutdown() {
// Close caches and connection pools
getSessionFactory().close();
}
}
ManageEmployee.java
This is the file for testing the application and from Eclipse you will run this program to test the application.
package net.roseindia;


import java.util.List;

import org.hibernate.Query;
import org.hibernate.Session;

public class ManageEmployee {
public static void main(String args[]){
Session session=HibernateUtil.getSessionFactory().openSession();
try{
session.beginTransaction();
Employee emp=new Employee();
emp.setEmpName("Rajesh Koothrapalli");

session.save(emp);
session.getTransaction().commit();

//Displaying inserted value
Query elist = session.createQuery("from Employee as emp where emp.EmpName = 'Rajesh Koothrapalli'");
List<Employee> empList = elist.list();
for (Employee e : empList) {
System.out.println("Employee ID : " + e.getEmpCode());
System.out.println("Employee Name : " + e.getEmpName());
}
}catch (Exception e) {
e.printStackTrace();
}finally{
session.close();
}
System.out.println("Hibernate Hello World Example");
}
}
To run the application right click this file (ManageEmployee.java) and then select run as -> Java Application in the Eclipse IDE. Eclipse will run the program and you can see result in the console.
Output of Program
You can use Eclipse IDE for compiling and testing the Application, which makes the development of application easy. After executing ManageEmployee.java code, you will get the following output in console:
Hibernate: insert into employee (Emp_name) values (?)
Hibernate: select employee0_.Emp_code as Emp1_0_, employee0_.Emp_name as Emp2_0_ from employee employee0_ where employee0_.Emp_name='Rajesh Koothrapalli'
Employee ID : 1
Employee Name : Rajesh Koothrapalli
Hibernate Hello World Example
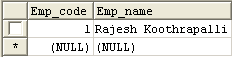
In database table Employee, you will find the inserted record:
We have 1000s of tutorials of Hibernate on our website and you can learn it from our website. Beginners can learn all the topics of Hibernate from our website.
