Spring 3 MVC File Upload, Spring MVC File Upload
In this tutorial we are going to create annotation based file upload example using Spring 3.0 MVC module.
In this tutorial we are going to create annotation based file upload example using Spring 3.0 MVC module.Spring 3 MVC File Upload
Creating file upload example using Spring 3 MVC
Learn how to create file upload application using Spring MVC module of the Spring 3 framework.
In this tutorial we are going to create annotation based file upload example using Spring 3.0 MVC module. In this tutorial we are creating file upload code and then use Eclipse IDE and tomcat to run the application.
Create a project in spring and add the files are libraries provided in the download of this example. You can also download the code and then import in Eclipse IDE.
In this the file upload example project following jar files are needed:
Jar Files :
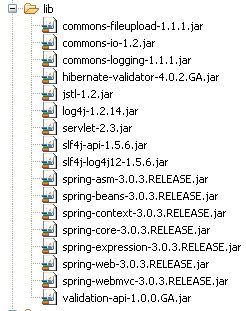
All the above jar files are available in the example code zip file. We have give the download link at the end of this tutorial.
This tutorial applied following steps :
Step 1 :
First we create Dynamic web project "Spring3Example". Now we create index.jsp file under WebContent folder. The code of index.jsp are given as:
|
<%@ page language="java" contentType="text/html; charset=ISO-8859-1" pageEncoding="ISO-8859-1"%> <!DOCTYPE html PUBLIC "-//W3C//DTD HTML 4.01 Transitional//EN" "http://www.w3.org/TR/html4/loose.dtd"> <html> <head> <meta http-equiv="Content-Type" content="text/html; charset=ISO-8859-1"> <title>Spring 3, MVC Examples</title> </head> <body> <h1>Spring 3, MVC Examples</h1> <ul> <li><a href="forms/uploadfileindex.html">File Upload</a></li> </ul> </body> </html> |
Step 2 :
Now create "UploadItem.java" under src folder. The UploadItem.java use the two variable
1.filename
2. fileData.
Code of "UploadItem.java" is given below as:
package net.roseindia.form;

import org.springframework.web.multipart.commons.CommonsMultipartFile;

public class UploadItem {
	private String filename;
	private CommonsMultipartFile fileData;

	public String getFilename() {
		return filename;
	}

	public void setFilename(String filename) {
		this.filename = filename;
	}

	public CommonsMultipartFile getFileData() {
		return fileData;
	}

	public void setFileData(CommonsMultipartFile fileData) {
		this.fileData = fileData;
	}
}
Step 3 :
Now create "UploadFileIndexController.java" under src folder. The code of "UploadFileIndexController.java" are given below as :
 package net.roseindia.controllers;

import java.util.Map;
import org.springframework.stereotype.Controller;
import org.springframework.validation.BindingResult;
import org.springframework.web.bind.annotation.RequestMapping;
import org.springframework.web.bind.annotation.RequestMethod;

@Controller
@RequestMapping("/uploadfileindex")
public class UploadFileIndexController {

	// Display the form on the get request
	@RequestMapping(method = RequestMethod.GET)
	public String showRegistration(Map model) {
		return "uploadfileindex";
	}

	// Process the form.
	@RequestMapping(method = RequestMethod.POST)
	public String processRegistration(BindingResult result) {
		return "uploadfileindex";
	}
}
Step 4 :
Now create "UploadFileController.java" file under src folder. "UploadFileController.java" use for the file upload and save in images folder. The code of "UploadFileController.java" is given below:
  package net.roseindia.controllers;

import org.springframework.stereotype.Controller;
import org.springframework.web.bind.annotation.RequestMapping;
import org.springframework.web.bind.annotation.RequestMethod;
import org.springframework.ui.Model;
import org.springframework.validation.BindingResult;
import org.springframework.validation.ObjectError;
import javax.servlet.http.HttpServletRequest;
import javax.servlet.http.HttpServletResponse;

import javax.servlet.ServletConfig;
import java.io.FileOutputStream;

import java.io.InputStream;
import java.io.OutputStream;
import javax.servlet.http.*;
import net.roseindia.form.UploadItem;
import org.springframework.web.multipart.MultipartFile;

@Controller
@RequestMapping(value = "/uploadfile")
public class UploadFileController {
	private String uploadFolderPath;
	ServletConfig config;

	public String getUploadFolderPath() {
		return uploadFolderPath;
	}

	public void setUploadFolderPath(String uploadFolderPath) {
		this.uploadFolderPath = uploadFolderPath;
	}

	@RequestMapping(method = RequestMethod.GET)
	public String getUploadForm(Model model) {
		model.addAttribute(new UploadItem());
		return "/uploadfile";
	}

	@RequestMapping(method = RequestMethod.POST)
	public String create(UploadItem uploadItem, BindingResult result,
			HttpServletRequest request, HttpServletResponse response,
			HttpSession session) {
		if (result.hasErrors()) {
			for (ObjectError error : result.getAllErrors()) {
				System.err.println("Error: " + error.getCode() + " - "
						+ error.getDefaultMessage());
			}
			return "/uploadfile";
		}

		// Some type of file processing...
		System.err.println("-------------------------------------------");
		try {
			MultipartFile file = uploadItem.getFileData();
			String fileName = null;
			InputStream inputStream = null;
			OutputStream outputStream = null;
			if (file.getSize() > 0) {
				inputStream = file.getInputStream();
				if (file.getSize() > 10000) {
					System.out.println("File Size:::" + file.getSize());
					return "/uploadfile";
				}
				System.out.println("size::" + file.getSize());
				fileName = request.getRealPath("") + "/images/"
						+ file.getOriginalFilename();
				outputStream = new FileOutputStream(fileName);
				System.out.println("fileName:" + file.getOriginalFilename());

				int readBytes = 0;
				byte[] buffer = new byte[10000];
				while ((readBytes = inputStream.read(buffer, 0, 10000)) != -1) {
					outputStream.write(buffer, 0, readBytes);
				}
				outputStream.close();
				inputStream.close();
			}

			// ..........................................
			session.setAttribute("uploadFile", file.getOriginalFilename());
		} catch (Exception e) {
			e.printStackTrace();
		}
		return "redirect:/forms/uploadfileindex";
	}

}
Step 5 :
Now create views folder under under "WebContent/WEB-INF". Again create "uploadfileindex.jsp" under "WebContent/WEB-INF/views". The code of "uploadfileindex.jsp" display as:
|
<%@page contentType="text/html;charset=UTF-8"%> <%@page pageEncoding="UTF-8"%> <%@ page session="true"%> <%@taglib prefix="core" uri="http://java.sun.com/jsp/jstl/core"%> <html> <head> <META http-equiv="Content-Type" content="text/html;charset=UTF-8"> <title>Welcome</title> </head> <body> <h2><a href="uploadfile.jsp">Upload Example</a></h2> <br> <br> <br> <br> <% if (session.getAttribute("uploadFile") != null && !(session.getAttribute("uploadFile")).equals("")) { %> <h3>Uploaded File</h3> <br> <img src="<%=request.getRealPath("/") + "/images/" + session.getAttribute("uploadFile")%>" alt="Upload Image" /> <% session.removeAttribute("uploadFile"); } %> </body> </html> |
Step 6 :
Now cerate "uploadfile.jsp" under "WebContent/WEB-INF/views". The code of "uploadfile.jsp" is given as :
|
<%@page contentType="text/html;charset=UTF-8"%> <%@page pageEncoding="UTF-8"%> <%@ page session="false"%> <%@ taglib prefix="form" uri="http://www.springframework.org/tags/form"%> <html> <head> <META http-equiv="Content-Type" content="text/html;charset=UTF-8"> <title>Upload Example</title> <script language="JavaScript"> function Validate() { var image =document.getElementById("image").value; if(image!=''){ var checkimg = image.toLowerCase(); if (!checkimg.match(/(\.jpg|\.png|\.JPG|\.PNG|\.jpeg|\.JPEG)$/)){ alert("Please enter Image File Extensions .jpg,.png,.jpeg"); document.getElementById("image").focus(); return false; } } return true; } </script> </head> <body> <form:form modelAttribute="uploadItem" name="frm" method="post" enctype="multipart/form-data" onSubmit="return Validate();"> <fieldset><legend>Upload File</legend> <table> <tr> <td><form:label for="fileData" path="fileData">File</form:label><br /> </td> <td><form:input path="fileData" id="image" type="file" /></td> </tr> <tr> <td><br /> </td> <td><input type="submit" value="Upload" /></td> </tr> </table> </fieldset> </form:form> </body> </html> |
Step 7:
Now modify "web.xml" as:
|
<?xml version="1.0" encoding="UTF-8"?> <web-app version="2.5" xmlns="http://java.sun.com/xml/ns/j2ee" xmlns:xsi="http://www.w3.org/2001/XMLSchema-instance" xsi:schemaLocation="http://java.sun.com/xml/ns/j2ee http://java.sun.com/xml/ns/j2ee/web-app_2_5.xsd"> <display-name>Spring3Example</display-name> <servlet> <servlet-name>dispatcher</servlet-name> <servlet-class>org.springframework.web.servlet.DispatcherServlet</servlet-class> <load-on-startup>1</load-on-startup> </servlet> <servlet-mapping> <servlet-name>dispatcher</servlet-name> <url-pattern>/forms/*</url-pattern> </servlet-mapping> <welcome-file-list> <welcome-file>index.jsp</welcome-file> </welcome-file-list> </web-app> |
Step 8:
Now create "dispatcher-servlet.xml" under "WebContent/WEB-INF". The "dispatcher-servlet.xml" file defined as:
|
<?xml version="1.0" encoding="UTF-8"?> <beans xmlns="http://www.springframework.org/schema/beans" xmlns:xsi="http://www.w3.org/2001/XMLSchema-instance" xmlns:p="http://www.springframework.org/schema/p" xmlns:context="http://www.springframework.org/schema/context" xmlns:mvc="http://www.springframework.org/schema/mvc" xsi:schemaLocation=" http://www.springframework.org/schema/beans http://www.springframework.org/schema/beans/spring-beans-3.0.xsd http://www.springframework.org/schema/context http://www.springframework.org/schema/context/spring-context-3.0.xsd http://www.springframework.org/schema/mvc http://www.springframework.org/schema/mvc/spring-mvc-3.0.xsd "> <!-- Enable annotation driven controllers, validation etc... --> <mvc:annotation-driven /> <context:component-scan base-package="net.roseindia.controllers" /> <bean id="viewResolver" class="org.springframework.web.servlet.view.InternalResourceViewResolver"> <property name="prefix"> <value>/WEB-INF/views/</value> </property> <property name="suffix"> <value>.jsp</value> </property> </bean> <bean id="messageSource" class="org.springframework.context.support.ReloadableResourceBundleMessageSource"> <property name="basename" value="/WEB-INF/messages" /> </bean> <!-- Configure the multipart resolver --> <bean id="multipartResolver" class="org.springframework.web.multipart.commons.CommonsMultipartResolver"> </bean> </beans> |
Where bean " multipartResolver" use for file upload and it defined as:
|
<!-- Configure the multipart resolver --> <bean id="multipartResolver" class="org.springframework.web.multipart.commons.CommonsMultipartResolver"> </bean> |
Step 9:
when run application display output as:
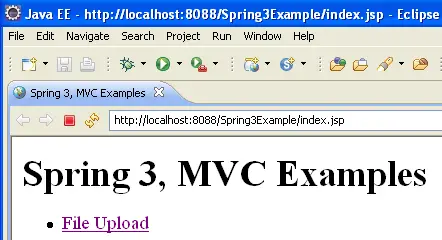
Step 10:
Now click hyperlink "File Upload" then display "uploadfileindex.jsp" page as:
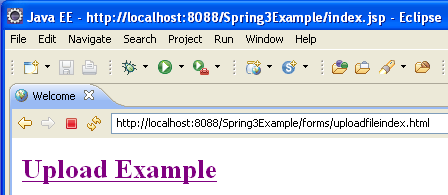
Again click hyperlink "Upload Example" then display "uploadfile.jsp" that use for file upload. If find any file upload time error then again display error and again display "uploadfile.jsp" page . Here file uploaded size defined 10000 byte and if file size more than 10000 byte then file not upload and again display "uploadfile.jsp" page. If not fined any error then file upload successful and display uploaded file in "uploadfileindex.jsp" page given as:
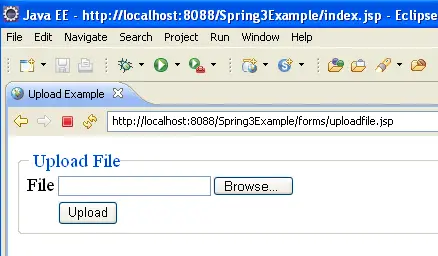
click Browse and select file

Again click "Upload" Button
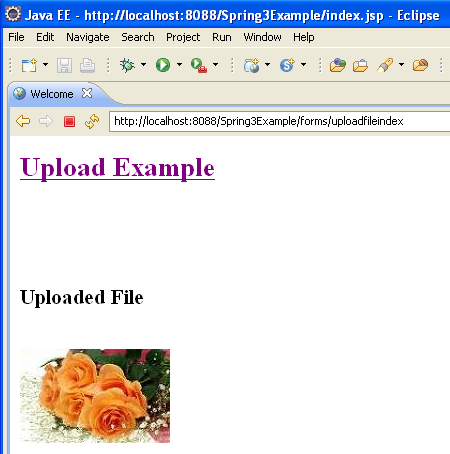
here display Uploaded File.
Download Code
Download the code of the application discussed here from the following url.