
TensorFlow 2.0 fashion MNIST example - Developing TensorFlow 2.0 image classification using Keras library
Developing image classification model in TensorFlow 2.0 and Keras on the fashion MNIST dataset. This is very first tutorial of image classification in TensorFlow 2.0 using the fashion MNIST dataset.
The fashion MNIST dataset comes with a collection of 60,000 training images and 10,000 test images. All the images are greyscale and come in a size of 28�28 pixels. These image dataset can be downloaded automatically with the help of TensorFlow 2.0 Keras dataset library.
Now I will show you how you can work with the Fashion MNIST data set into TensorFlow 2.0.0 project to develop image classification model. The Keras API provides interface for automatic downloading of Fashion MNIST data. We will use this Keras interface to quickly download data and use Keras API for training the image classification model. After completing this tutorial you will learn to create, train, test and deploy your machine learning model with Keras API backed with TensorFlow 2.0 engine.
What is Fashion MNIST Dataset?
The Fashion MNIST dataset contains 60,000 greyscale images of 28x28 pixels size in 10 classes. Dataset also comes with 10,000 images as test dataset which can be used for testing the accuracy of trained model. These datasets can be directly downloaded by TensorFlow 2.0.0 and Keras program. So, developer can quickly use this data set for developing, training and testing their AI/ML example programs.
In this tutorial we will use the Fashion MNIST dataset for training our image classification model.
Step 1: Create a blank python 3 notebook
We will use Google Colab to run this example code. First of go to the Google Colab and then create a Python 3 note book as shown below:

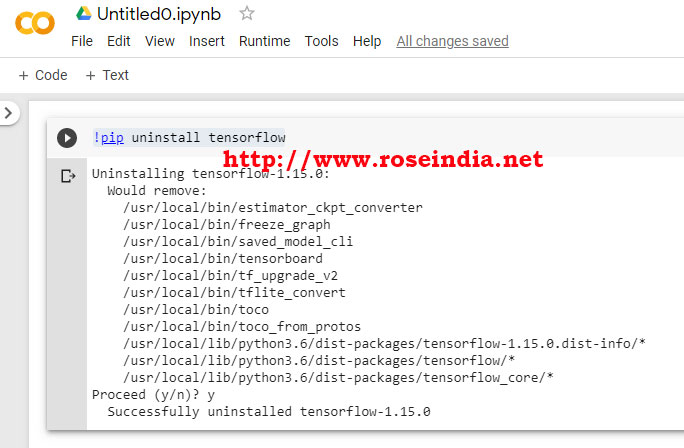
Step 2: Install TensorFlow 2.0.0
First of remove old version of TensorFlow with following command:
!pip uninstall tensorflow
To run above command you can click on the GO icon or press Ctrl+Enter buttons.
Here is the screen shot of the process:
Step 3: Install TensorFlow 2.0
Now we will install TensorFlow 2.0 on the Google Colab machine learning platform. Run the following command to install TensorFlow 2.0.0 on Google Colab:
!pip install tensorflow===2.0.0To run this command press Ctrl+Enter. Here is the screen shot of the process:
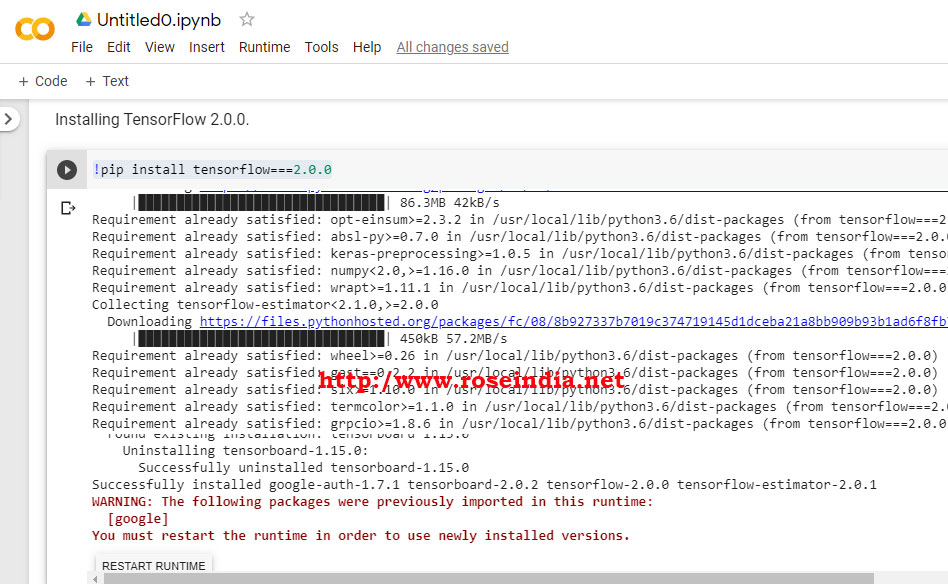
Once the installation is completed. Click on the "Restart Runtime" button to restart the runtime environment.
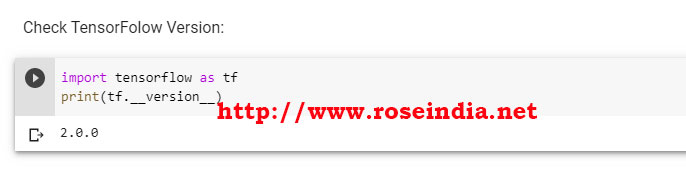
Step 4: Checking TensorFlow version installed.
The next step is to check the version of TensorFlow. Here is the code to get TensorFlow version:
import tensorflow as tf
print(tf.__version__)
Above code display "2.0.0" as version of installed TensorFlow. Here is the screen shot which shows the version of TensorFlow on Google Colab:
Step 5: Download fashion MNIST dataset
Now will download the fashion MNIST dataset using Keras library of TensorFlow to use in our project. You can prepare your own dataset for training the machine training machine learning model but its easy to get started with the standard datasets such as MNIST dataset.
In the above code we have imported TensorFlow library and run version check. Now following code downloads
import tensorflow as tf

mnist = tf.keras.datasets.fashion_mnist

(x_train, labels_train), (x_test, labels_test) = mnist.load_data()

x_train, x_test = x_train/225.0, x_test/255.0
In the above code we are importing the Fashion MNIST dataset into x_train and x_test variables. The labels_train and labels_test contains the categorization details of the image. In the Fashion MNIST dataset images are classified into following categories:
- T-shirt/top
- Trouser
- Pullover
- Dress
- Coat
- Sandal
- Shirt
- Sneaker
- Bag
- Ankle boot
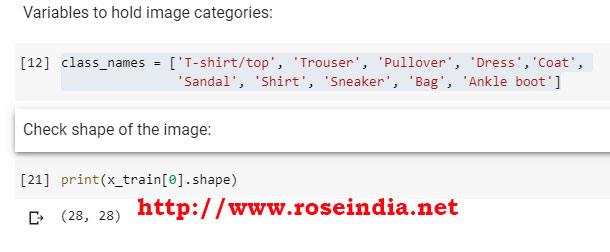
We have defined the following variable for category which will used to display the image category name:
class_names = ['T-shirt/top', 'Trouser', 'Pullover', 'Dress','Coat',
               'Sandal', 'Shirt', 'Sneaker', 'Bag', 'Ankle boot']
Now we will check the size of image. The image size is 28x28 pixels and you can see by running the following code:
print(x_train[0].shape)
Here is the screen shot of the image size: 0
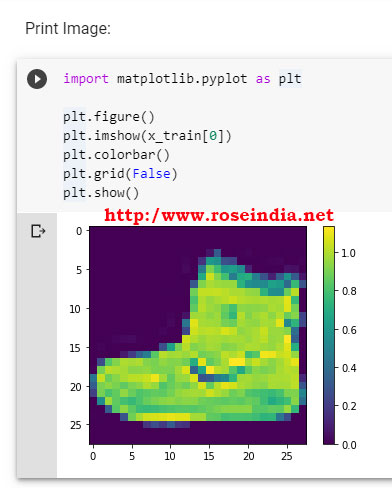
Printing and checking the image of train data set. You can view image by running following code:
import matplotlib.pyplot as plt

plt.figure()
plt.imshow(x_train[0])
plt.colorbar()
plt.grid(False)
plt.show()
Here we are using the matplotlib library to print the image. Following screenshot shows the image: 1
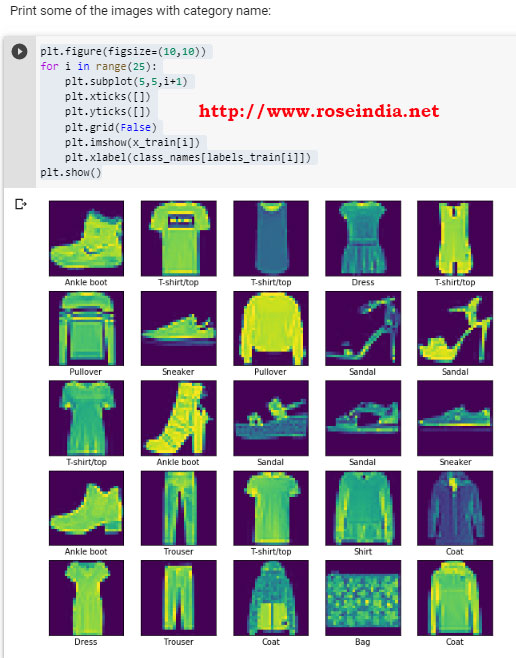
You can also print many pictures at a time with following code:
plt.figure(figsize=(10,10))
for i in range(25):
    plt.subplot(5,5,i+1)
    plt.xticks([])
    plt.yticks([])
    plt.grid(False)
    plt.imshow(x_train[i])
    plt.xlabel(class_names[labels_train[i]])
plt.show()
If you run above code, following images will be displayed: 2
If you want to print all the images in greyscale following code can be used:
plt.figure(figsize=(10,10))
for i in range(25):
    plt.subplot(5,5,i+1)
    plt.xticks([])
    plt.yticks([])
    plt.grid(False)
    plt.imshow(x_train[i], cmap=plt.cm.binary)
    plt.xlabel(class_names[labels_train[i]])
plt.show()
So, we have downloaded and understood the data by checking its size and displaying as image on the screen. Now, we will move on to our next step to create the model. 3
Creating image classification model
For the image classification model we are going to use the Keras libraries which are included in the TensorFlow 2.0.
Here is the code of our model: 4
model = tf.keras.models.Sequential([
  tf.keras.layers.Flatten(input_shape=(28, 28)),
  tf.keras.layers.Dense(128, activation='relu'),
  tf.keras.layers.Dropout(0.2),
  tf.keras.layers.Dense(10, activation='softmax')
])
You can view the model details with following command:
model.summary()Here is the screen shot from Google Colab notebook:
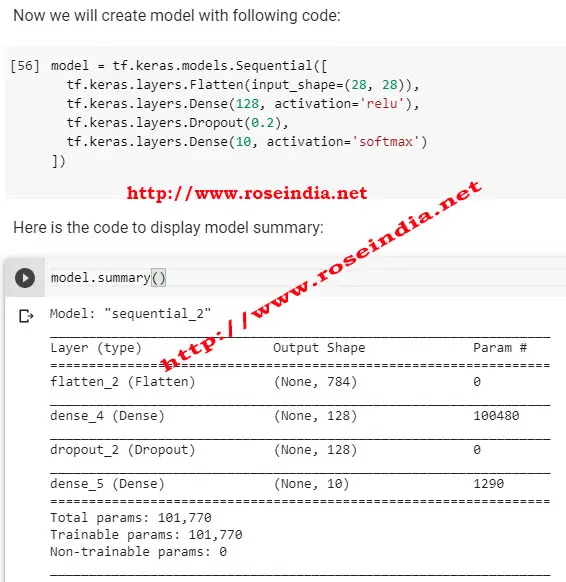 5
5
In our model we have total 101,770 Trainable parameters.
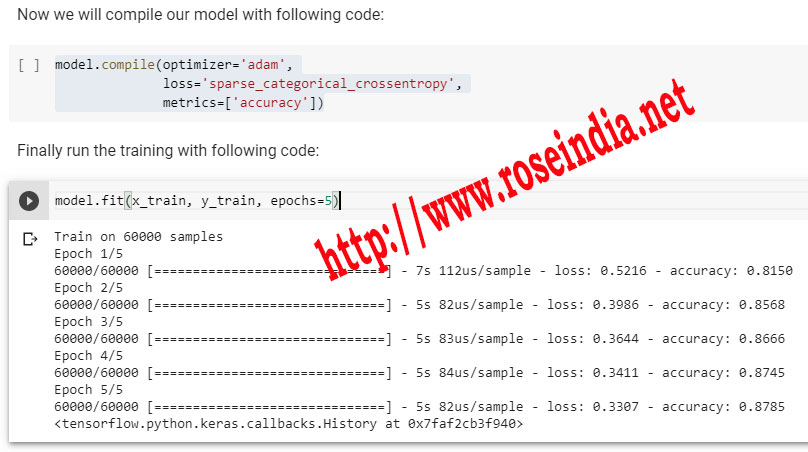
Now we will compile our model with following code:
model.compile(optimizer='adam',
              loss='sparse_categorical_crossentropy',
              metrics=['accuracy'])
To train the mode with 5 epochs run following code: 6
model.fit(x_train, y_train, epochs=5)
Here is the screen grab of training process:
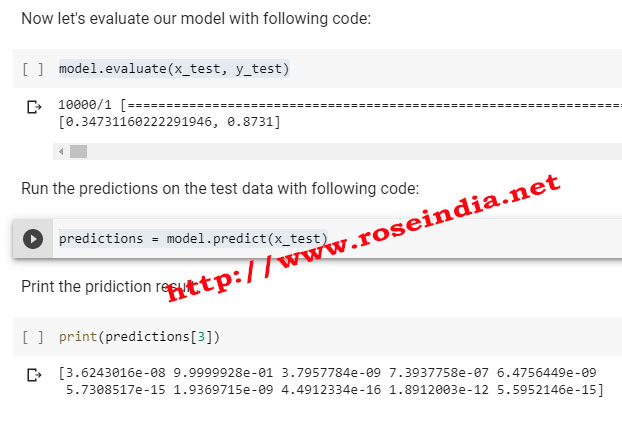
After training you can evaluate your model with following code: 7
model.evaluate(x_test, y_test)
To run the predictions on test data execute following code:
predictions = model.predict(x_test)
Here is the screen grab of evaluate and prediction process:
 8
8
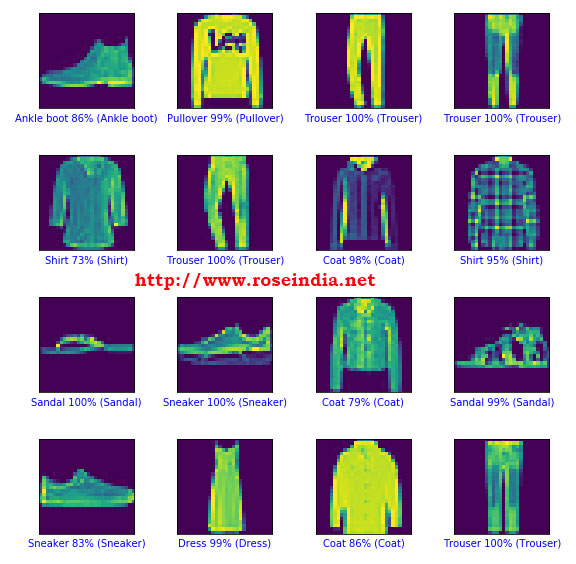
Finally we can print the prediction results with following code:
def plot_image(i, predictions_array, true_label, img):
  predictions_array, true_label, img = predictions_array, true_label[i], img[i]
  plt.grid(False)
  plt.xticks([])
  plt.yticks([])
  plt.imshow(img)
  predicted_label = np.argmax(predictions_array)
  if predicted_label == true_label:
    color = 'blue'
  else:
    color = 'red'
  plt.xlabel("{} {:2.0f}% ({})".format(class_names[predicted_label],
                                100*np.max(predictions_array),
                                class_names[true_label]),
                                color=color)

#print the images
num_rows = 5
num_cols = 4
num_images = num_rows*num_cols
plt.figure(figsize=(2*num_cols, 2*num_rows))
for i in range(num_images):
  plt.subplot(num_rows, num_cols, i+1)
  plot_image(i, predictions[i], labels_test, x_test)
plt.tight_layout()
plt.show()
Here is the print of prediction:
 9
9
Here is the complete code of this tutorial:
# -*- coding: utf-8 -*-
"""Classification_Fashion_MNIST.ipynb

"""

!pip uninstall tensorflow

"""Installing TensorFlow 2.0.0."""

!pip install tensorflow===2.0.0

"""Check TensorFolow Version:"""

import tensorflow as tf
print(tf.__version__)

"""Now the next step is to load MNIST dataset and then prepare it. As a part of data preparation process integers from the sample data set has to be converted to floating-point numbers. Here is the code:"""

import tensorflow as tf

mnist = tf.keras.datasets.fashion_mnist

(x_train, labels_train), (x_test, labels_test) = mnist.load_data()

x_train, x_test = x_train/225.0, x_test/255.0

"""Variables to hold image categories:"""

class_names = ['T-shirt/top', 'Trouser', 'Pullover', 'Dress','Coat',
               'Sandal', 'Shirt', 'Sneaker', 'Bag', 'Ankle boot']

"""Check shape of the image:"""

print(x_train[0].shape)

"""Print Image:"""

import matplotlib.pyplot as plt

plt.figure()
plt.imshow(x_train[0])
plt.colorbar()
plt.grid(False)
plt.show()

"""Images categories:

Print some of the images with category name:
"""

plt.figure(figsize=(10,10))
for i in range(25):
    plt.subplot(5,5,i+1)
    plt.xticks([])
    plt.yticks([])
    plt.grid(False)
    plt.imshow(x_train[i])
    plt.xlabel(class_names[labels_train[i]])
plt.show()

"""If you want to show the grey image use following code:"""

plt.figure(figsize=(10,10))
for i in range(25):
    plt.subplot(5,5,i+1)
    plt.xticks([])
    plt.yticks([])
    plt.grid(False)
    plt.imshow(x_train[i], cmap=plt.cm.binary)
    plt.xlabel(class_names[labels_train[i]])
plt.show()

"""Now we will create model with following code:"""

model = tf.keras.models.Sequential([
  tf.keras.layers.Flatten(input_shape=(28, 28)),
  tf.keras.layers.Dense(128, activation='relu'),
  tf.keras.layers.Dropout(0.2),
  tf.keras.layers.Dense(10, activation='softmax')
])

"""Here is the code to display model summary:"""

model.summary()

"""Now we will compile our model with following code:"""

model.compile(optimizer='adam',
              loss='sparse_categorical_crossentropy',
              metrics=['accuracy'])

"""Finally run the training with following code:"""

model.fit(x_train, y_train, epochs=5)

"""Now let's evaluate our model with following code:"""

model.evaluate(x_test, y_test)

"""Run the predictions on the test data with following code:"""

predictions = model.predict(x_test)

"""Print the pridiction result:"""

print(predictions[3])

"""Print"""

import numpy as np

def plot_image(i, predictions_array, true_label, img):
  predictions_array, true_label, img = predictions_array, true_label[i], img[i]
  plt.grid(False)
  plt.xticks([])
  plt.yticks([])
  plt.imshow(img)
  predicted_label = np.argmax(predictions_array)
  if predicted_label == true_label:
    color = 'blue'
  else:
    color = 'red'
  plt.xlabel("{} {:2.0f}% ({})".format(class_names[predicted_label],
                                100*np.max(predictions_array),
                                class_names[true_label]),
                                color=color)

#print the images
num_rows = 5
num_cols = 4
num_images = num_rows*num_cols
plt.figure(figsize=(2*num_cols, 2*num_rows))
for i in range(num_images):
  plt.subplot(num_rows, num_cols, i+1)
  plot_image(i, predictions[i], labels_test, x_test)
plt.tight_layout()
plt.show()
In this tutorial we have developed TensorFlow 2.0 and Keras based image classification model on the fashion MNIST data set.
Download the source code from: 0
You can find more tutorials at: