Spring 3 MVC Registration Form Example
n this tutorial we are create RegistrationForm in Spring 3.0. In this tutorial we are using annotation based Controller and another related files.
n this tutorial we are create RegistrationForm in Spring 3.0. In this tutorial we are using annotation based Controller and another related files.Spring 3 MVC Registration Form Example
In this tutorial we are create RegistrationForm in Spring 3.0. In this tutorial we are using annotation based Controller and another related files.
Example discussed here will present user registration form to the user. The fields of the registration form are:
- User Name
- Password
- Confirm Password
Our application will validate all these fields. If there is some error it will display on the form.
In this tutorial we are using following jar files.

In this tutorial apply following steps.
Step 1:
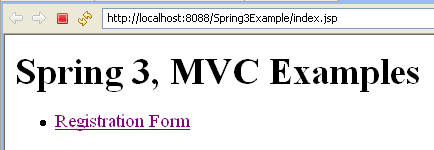
First create a Dynamic Web Project "Spring3Example". Now create "index.jsp" under WebContent folder. The code of "index.jsp" as defined:
|
<%@ page language="java" contentType="text/html; charset=ISO-8859-1" pageEncoding="ISO-8859-1"%> <!DOCTYPE html PUBLIC "-//W3C//DTD HTML 4.01 Transitional//EN" "http://www.w3.org/TR/html4/loose.dtd"> <html> <head> <meta http-equiv="Content-Type" content="text/html; charset=ISO-8859-1"> <title>Spring 3, MVC Examples</title> </head> <body> <h1>Spring 3, MVC Examples</h1> <ul> <li><a href="forms/registrationform.html">Registration Form</a></li> </ul> </body> </html> |
Step 2:
Now create model class "Registration.java" user src folder. Registration.java class use variable userName, password , confirmPassword and email. The code of "Registration.java" defined as:
 package net.roseindia.form;

import javax.validation.constraints.Size;
import org.hibernate.validator.constraints.Email;
import org.hibernate.validator.constraints.NotEmpty;

public class Registration {
	private String userName;
	@NotEmpty
	@Size(min = 4, max = 20)
	private String password;
	@NotEmpty
	private String confirmPassword;
	@NotEmpty
	@Email
	private String email;

	public void setUserName(String userName) {
		this.userName = userName;
	}

	public String getUserName() {
		return userName;
	}

	public void setPassword(String password) {
		this.password = password;
	}

	public String getPassword() {
		return password;
	}

	public void setConfirmPassword(String confirmPassword) {
		this.confirmPassword = confirmPassword;
	}

	public String getConfirmPassword() {
		return confirmPassword;
	}

	public void setEmail(String email) {
		this.email = email;
	}

	public String getEmail() {
		return email;
	}

}
Step 3:
Now create Controller class "RegistrationController.java" under src folder. "RegistrationController.java" class use for custom validation purpose class "RegistrationValidation.java". "RegistrationController.java" use @Autowired for access "RegistrationValidation.java" and another configration purpose. The code of "RegistrationController.java" defined as :
package net.roseindia.controllers;

import java.util.Map;
import javax.validation.Valid;
import org.springframework.beans.factory.annotation.Autowired;
import org.springframework.stereotype.Controller;
import org.springframework.validation.BindingResult;
import org.springframework.web.bind.annotation.RequestMapping;
import org.springframework.web.bind.annotation.RequestMethod;

import net.roseindia.form.Registration;

@Controller
@RequestMapping("/registrationform.html")
public class RegistrationController {
	@Autowired
	private RegistrationValidation registrationValidation;

	public void setRegistrationValidation(
			RegistrationValidation registrationValidation) {
		this.registrationValidation = registrationValidation;
	}

	// Display the form on the get request
	@RequestMapping(method = RequestMethod.GET)
	public String showRegistration(Map model) {
		Registration registration = new Registration();
		model.put("registration", registration);
		return "registrationform";
	}

	// Process the form.
	@RequestMapping(method = RequestMethod.POST)
	public String processRegistration(@Valid Registration registration,
			BindingResult result) {
		// set custom Validation by user
		registrationValidation.validate(registration, result);
		if (result.hasErrors()) {
			return "registrationform";
		}
		return "registrationsuccess";
	}
}
Step 4:
Now create the validation class "RegistrationValidation.java" under src folder. In "RegistrationValidation.java" you defined all error that is necessary for validation. The code of "RegistrationValidation.java" defined :
package net.roseindia.controllers;
|
Step 5:
Now create the views folder under WebContent/WEB-INF. Again create the "registrationform.jsp" under views folder. The path of "registrationform.jsp" is WebContent/WEB-INF/views/registrationform.jsp and code given below :
|
<%@ page language="java" contentType="text/html; charset=ISO-8859-1" pageEncoding="ISO-8859-1"%> <%@ taglib prefix="form" uri="http://www.springframework.org/tags/form"%> <!DOCTYPE html PUBLIC "-//W3C//DTD HTML 4.01 Transitional//EN" "http://www.w3.org/TR/html4/loose.dtd"> <html> <head> <meta http-equiv="Content-Type" content="text/html; charset=ISO-8859-1"> <title>Insert title here</title> </head> <body> <form:form method="Post" action="registrationform.html" commandName="registration"> <table> <tr> <td>User Name:<FONT color="red"><form:errors path="userName" /></FONT></td> </tr> <tr> <td><form:input path="userName" /></td> </tr> <tr> <td>Password:<FONT color="red"><form:errors path="password" /></FONT></td> </tr> <tr> <td><form:password path="password" /></td> </tr> <tr> <td>Confirm Password:<FONT color="red"><form:errors path="confirmPassword" /></FONT></td> </tr> <tr> <td><form:password path="confirmPassword" /></td> </tr> <tr> <td>Email:<FONT color="red"><form:errors path="email" /></FONT></td> </tr> <tr> <td><form:input path="email" /></td> </tr> <tr> <td><input type="submit" value="Submit" /></td> </tr> </table> </form:form> </body> </html> |
Step 6:
Now create the "registrationsuccess.jsp" under WebContent/WEB-INF/views. The code of "registrationsuccess.jsp" is given as:
|
<%@ page language="java" contentType="text/html; charset=ISO-8859-1" pageEncoding="ISO-8859-1"%> <%@taglib prefix="core" uri="http://java.sun.com/jsp/jstl/core"%> <!DOCTYPE html PUBLIC "-//W3C//DTD HTML 4.01 Transitional//EN" "http://www.w3.org/TR/html4/loose.dtd"> <html> <head> <meta http-equiv="Content-Type" content="text/html; charset=ISO-8859-1"> <title>Insert title here</title> </head> <body> <h3>Welcome Registration Successfully.</h3> <table> <tr> <td>User Name :</td> <td><core:out value="${registration.userName}" /></td> </tr> <tr> <td>Password :</td> <td><core:out value="${registration.password}" /></td> </tr> </table> </body> </html> |
Step 7:
Now modify the web.xml under WebContent/WEB-INF. The code of web.xml as:
|
<?xml version="1.0" encoding="UTF-8"?> <web-app version="2.5" xmlns="http://java.sun.com/xml/ns/j2ee" xmlns:xsi="http://www.w3.org/2001/XMLSchema-instance" xsi:schemaLocation="http://java.sun.com/xml/ns/j2ee http://java.sun.com/xml/ns/j2ee/web-app_2_5.xsd"> <display-name>Spring3Example</display-name> <servlet> <servlet-name>dispatcher</servlet-name> <servlet-class>org.springframework.web.servlet.DispatcherServlet</servlet-class> <load-on-startup>1</load-on-startup> </servlet> <servlet-mapping> <servlet-name>dispatcher</servlet-name> <url-pattern>/forms/*</url-pattern> </servlet-mapping> <welcome-file-list> <welcome-file>index.jsp</welcome-file> </welcome-file-list> </web-app> |
Step 8:
Now create the "dispatcher-servlet.xml" under WebContent/WEB-INF that configuration all Spring related. The code "dispatcher-servlet.xml" given as:
|
<?xml version="1.0" encoding="UTF-8"?> <beans xmlns="http://www.springframework.org/schema/beans" xmlns:xsi="http://www.w3.org/2001/XMLSchema-instance" xmlns:p="http://www.springframework.org/schema/p" xmlns:context="http://www.springframework.org/schema/context" xmlns:mvc="http://www.springframework.org/schema/mvc" xsi:schemaLocation=" http://www.springframework.org/schema/beans http://www.springframework.org/schema/beans/spring-beans-3.0.xsd http://www.springframework.org/schema/context http://www.springframework.org/schema/context/spring-context-3.0.xsd http://www.springframework.org/schema/mvc http://www.springframework.org/schema/mvc/spring-mvc-3.0.xsd "> <!-- Enable annotation driven controllers, validation etc... --> <mvc:annotation-driven /> <context:component-scan base-package="net.roseindia.controllers" /> <bean id="viewResolver" class="org.springframework.web.servlet.view.InternalResourceViewResolver"> <property name="prefix"> <value>/WEB-INF/views/</value> </property> <property name="suffix"> <value>.jsp</value> </property> </bean> <bean id="messageSource" class="org.springframework.context.support.ReloadableResourceBundleMessageSource"> <property name="basename" value="/WEB-INF/messages" /> </bean> </beans> |
Step 9:
Now create the messages properties file "messages.properties" under WebContent/WEB-INF,and modify the "messages.properties" as:
|
NotEmpty.registration.password=Password must not be blank. Size.registration.password=Password must between 4 to 20 characters. |
Step 10:
Now run Application display output as:::
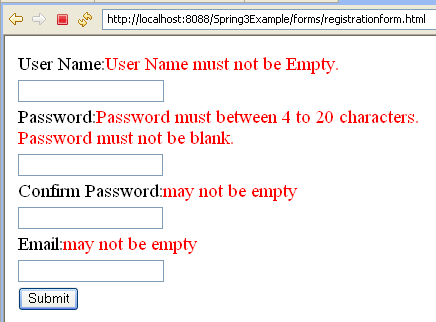
Again click hyperlink Registration Form display Registration Form and if press Submit Button without any value enter in text field display error messages as:
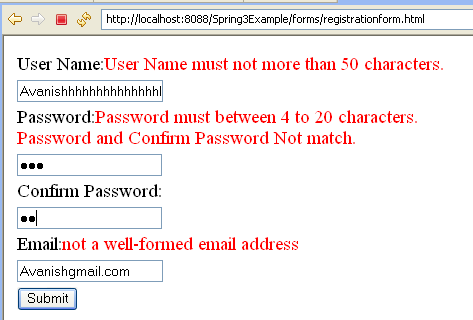
Again if User Name more than 50 Characters , (password and confirm password) not match and email incorrect then display error message as:
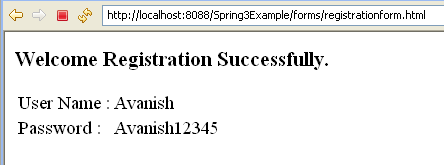
If All information are valid then display Registration Success Page as:
Download the code of the example